Apache Kafka is an open-source distributed event streaming platform. It can function as a messaging system for reading and writing data streams, enabling message publishing and subscription. It also supports building scalable stream-processing applications for real-time scenarios, and integrates with databases to securely store streaming data in a distributed, replicated, and fault-tolerant cluster. The "event streams" it produces act as the central nervous system of data transmission.
If you plan to write data from Kafka into a YMatrix cluster, this document is essential. YMatrix Database supports seamless Kafka integration, allowing continuous and automatic ingestion of Kafka data into YMatrix tables, with support for GUI-based operations.
Currently supported data formats are CSV and JSON. We will walk through a simple example to demonstrate how to integrate Kafka data using the YMatrix Management Platform.
First, set up a healthy Kafka environment by following the official guide: Kafka Quickstart.
Now that you have set up Kafka on your server, enter the directory with the following command or by other means:
$ cd packages/kafka_2.13-3.2.0Then start the Kafka service and create a test topic (Topic). The default port is 9092:
$ bin/kafka-topics.sh --create --topic csv_test --bootstrap-server localhost:9092Then write several test records one by one, ending with ctrl-c:
$ bin/kafka-console-producer.sh --topic csv_test --bootstrap-server localhost:9092
>1,Beijing,123.05,true,1651043583,1651043583123,1651043583123456
>2,Shanghai,112.95,true,1651043583,1651043583123,1651043583123456
>3,Shenzhen,100.0,false,1651043583,1651043583123,1651043583123456
>4,Guangxi,88.5,false,1651043583,1651043583123,1651043583123456
>^C
The above commands write four records to the newly created csv_test topic, each a comma-separated CSV line.
Preparation is complete. The following sections describe how to create a Kafka data stream to ingest data.
In a browser, enter the IP address (by default the IP of the master node) and the port number of the host where MatrixUI is located:
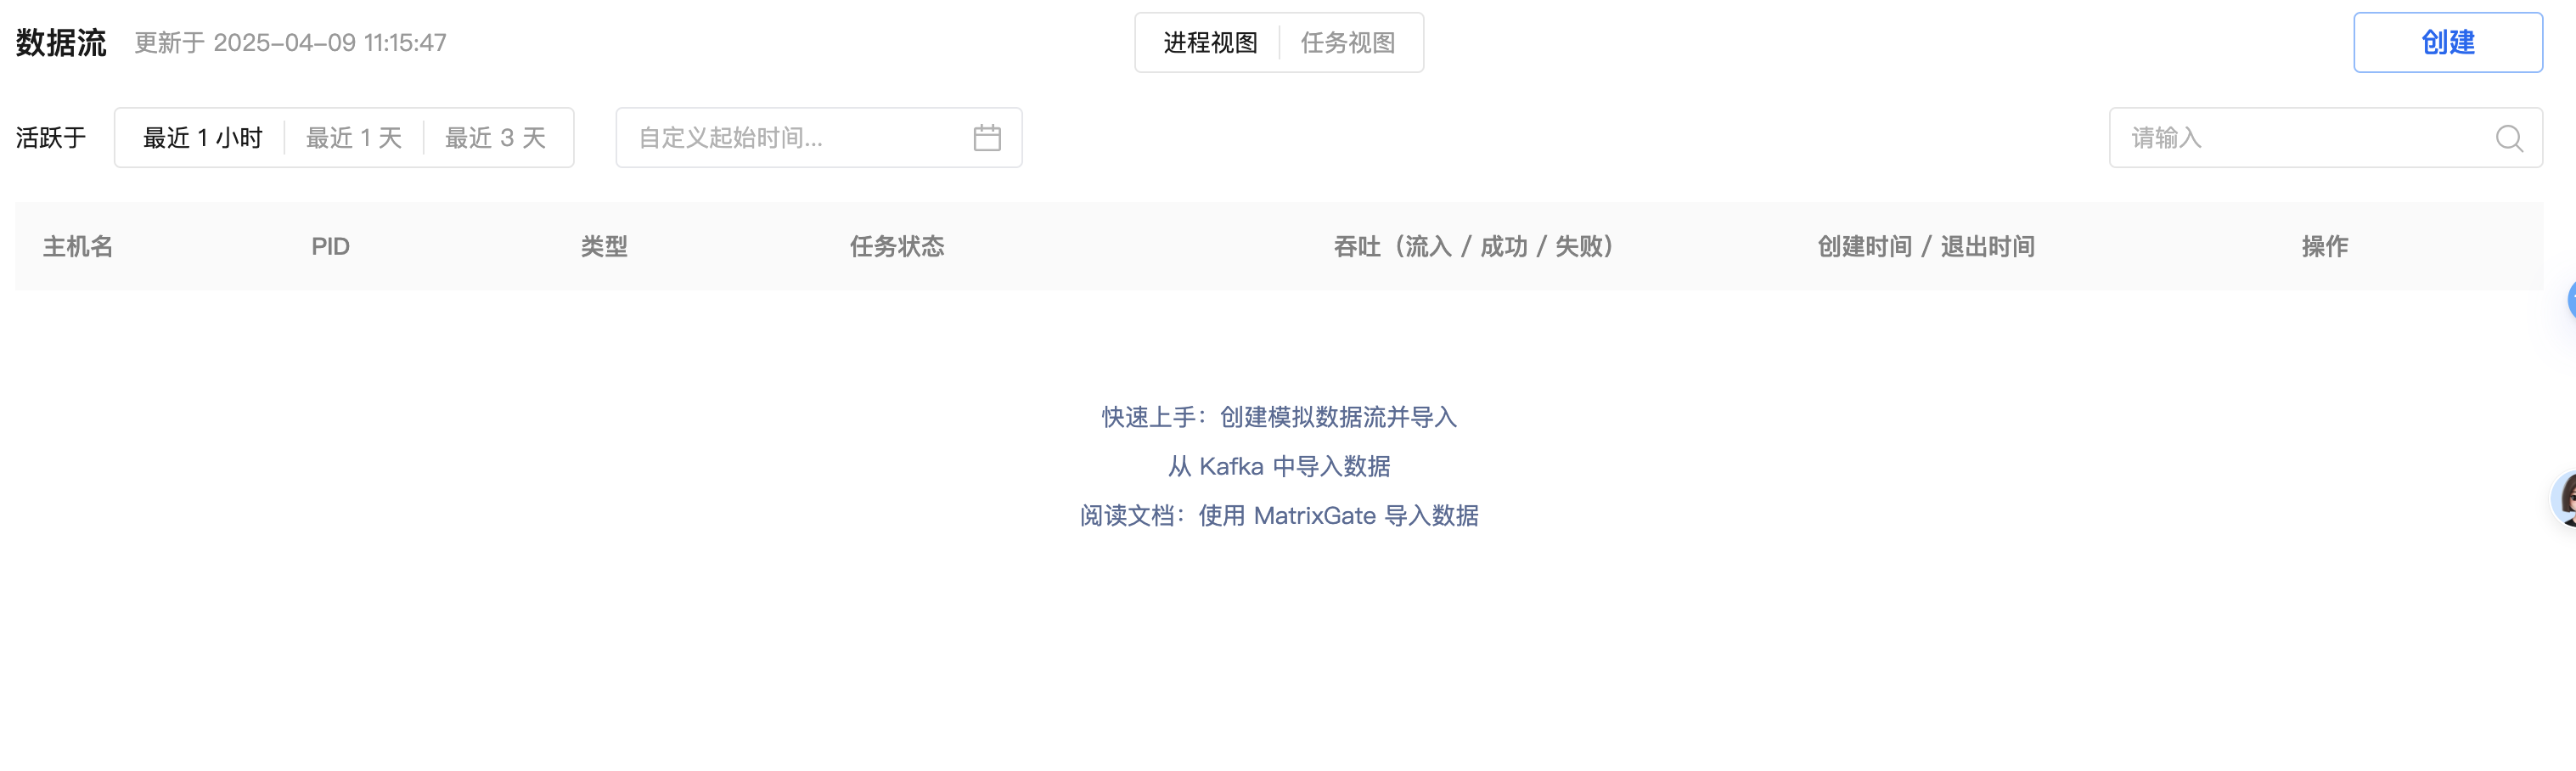
http://<IP>:8240After a successful login, the main interface appears. The interface is divided into the Processes view and the Tasks view. The Processes view shows the running MatrixGate processes, and the Tasks view shows all data ingestion tasks. One MatrixGate process can contain multiple tasks.
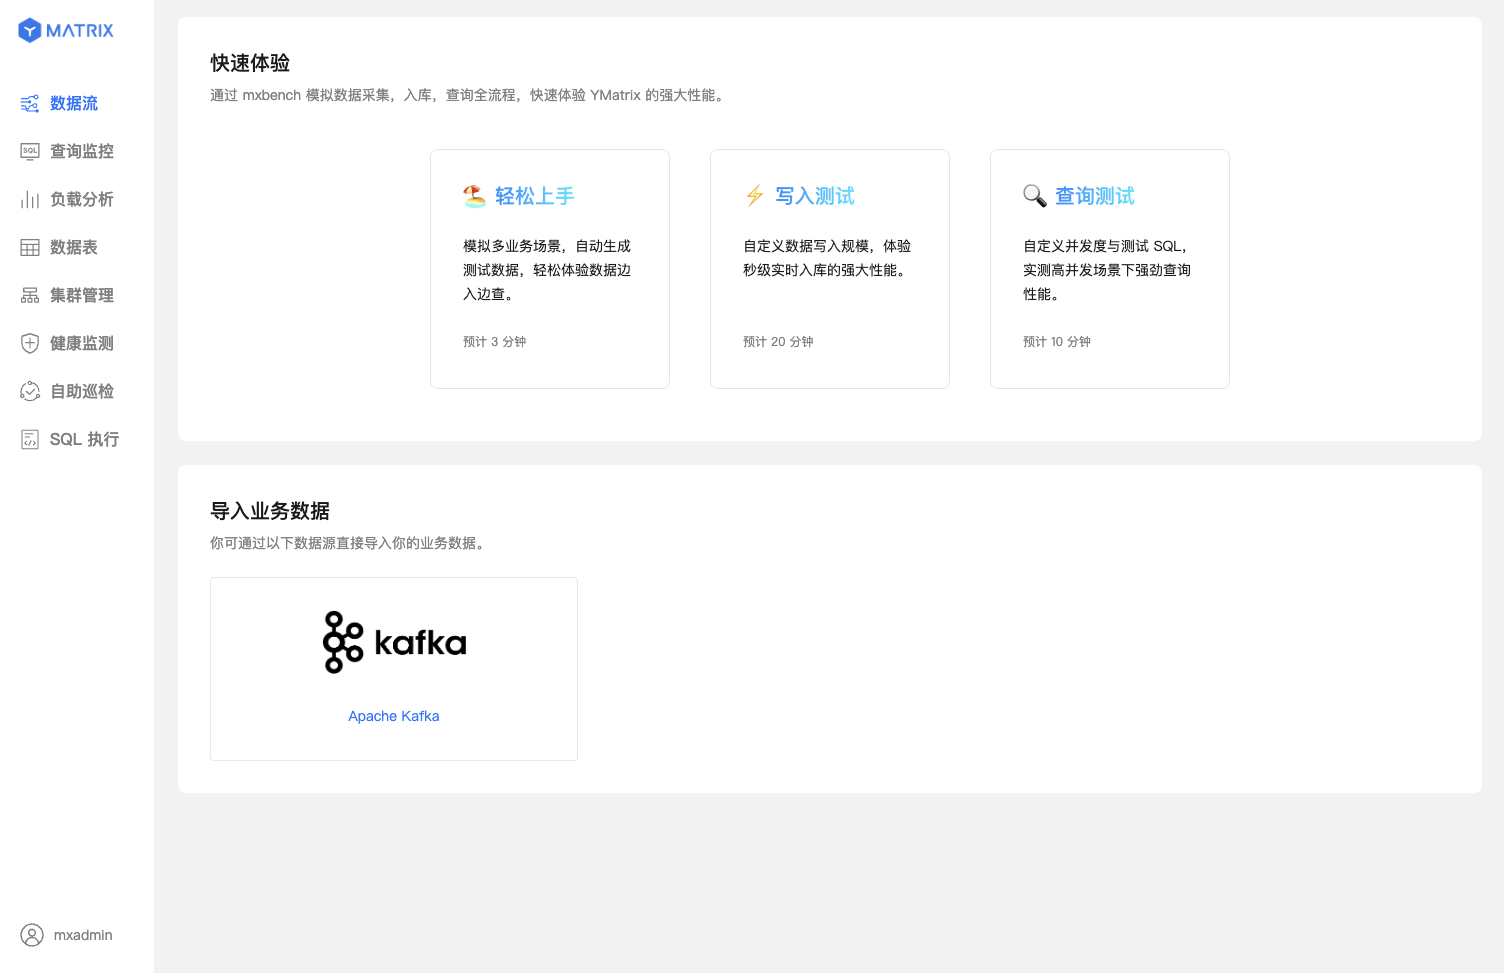
Click "Import Data from Kafka".
Select the Kafka data source. The steps are first explained with a CSV file as the example.
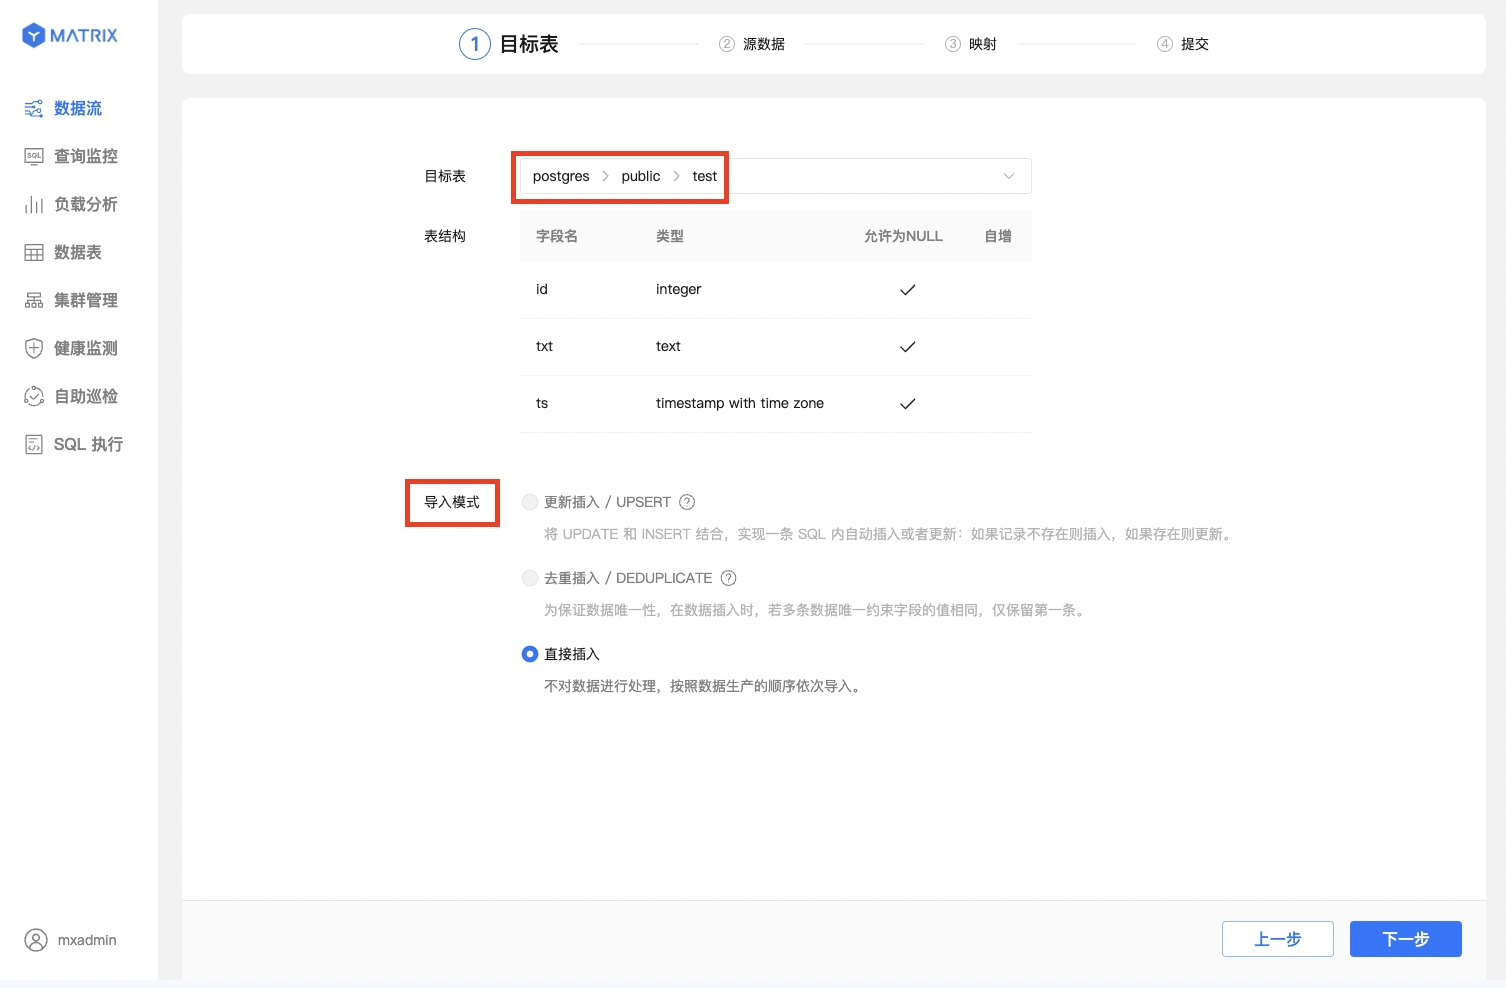
First, you can select an existing table or create a new table as the target table that receives Kafka data.
2.1.1.1 Select an Existing Table
In the Target table field, select an existing table and the Importing mode. Here the selected table is assumed to be test in the public schema of the postgres database. After the selection, the table structure (field name, type, whether NULL is allowed, and whether the field is auto-increment) is listed below for field verification.
The Importing mode determines how duplicate data is handled. Choose it according to the constraints of the target table:
2.1.1.2 Create a New Table
For a new table, here the schema is assumed to be public and the table name test1.
When creating a new table, first select the Table type:
You do not define the table structure at this step. Field names and types are determined in step 3, "Mapping", through Automatic mapping or manual editing. Only the "UPSERT" and "INSERT" Importing modes are supported for new tables.
When "Partitioned table" is selected, the Automatic partition settings appear below:

When "Non-partitioned table" is selected, no automatic partitioning is involved:

After the table is created successfully, a red New marker appears.
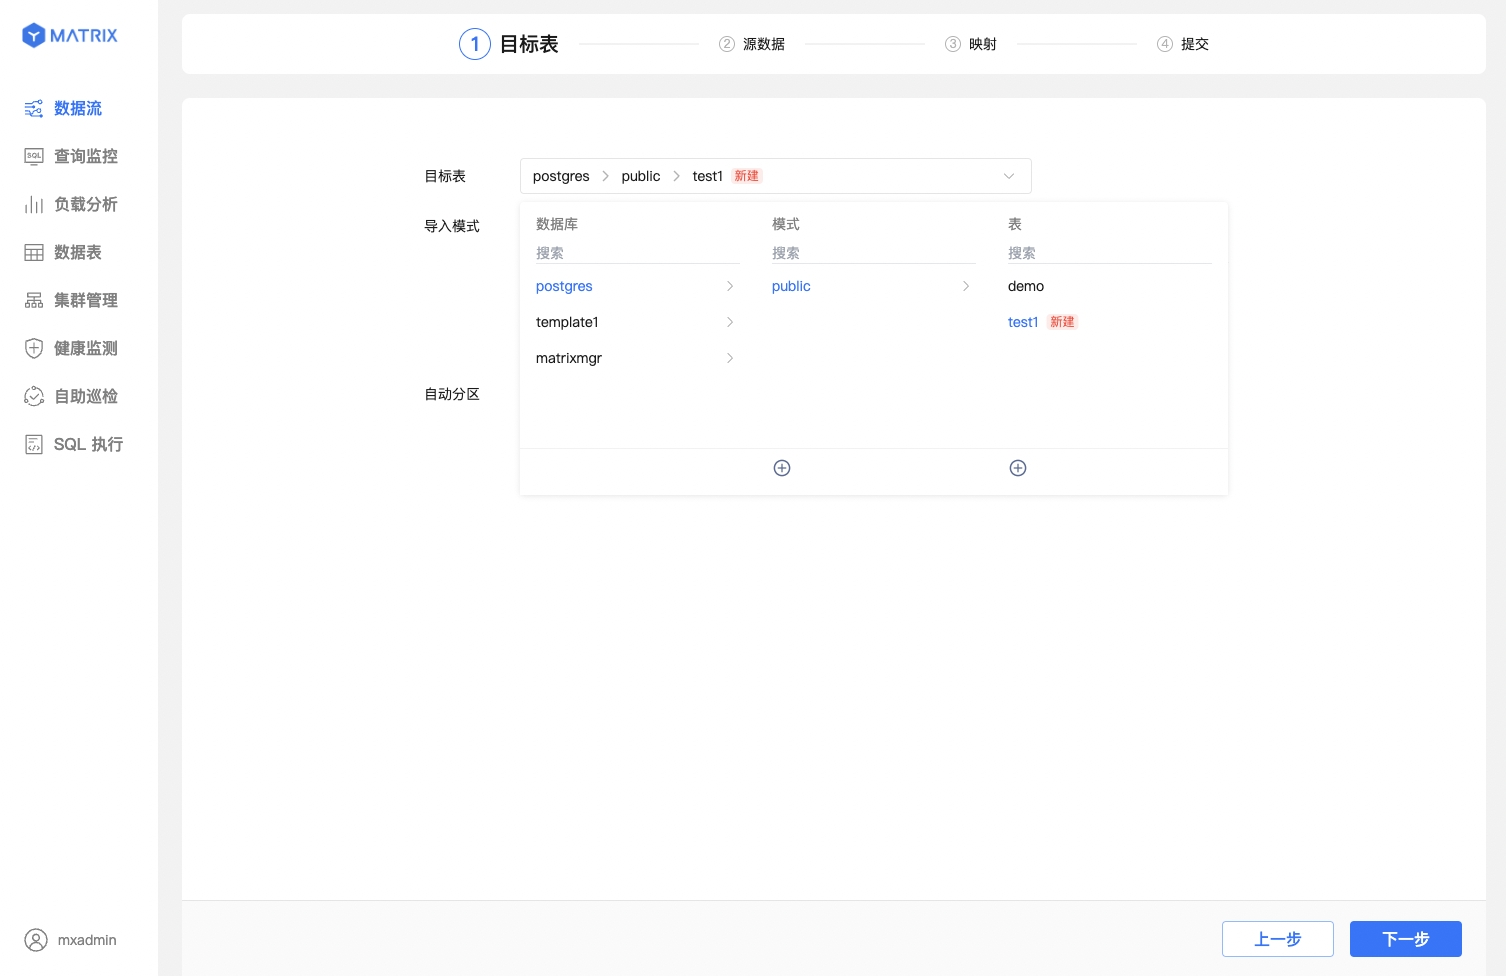
Select the Importing mode and the Automatic partition strategy for it. Here the partition strategy uses auto_partitioning by default. For a non-partitioned table, only the Importing mode is selected; no Automatic partition strategy is involved.

After the target table is selected, the second step configures the source data connection. You must complete the following operations before proceeding to the next step:
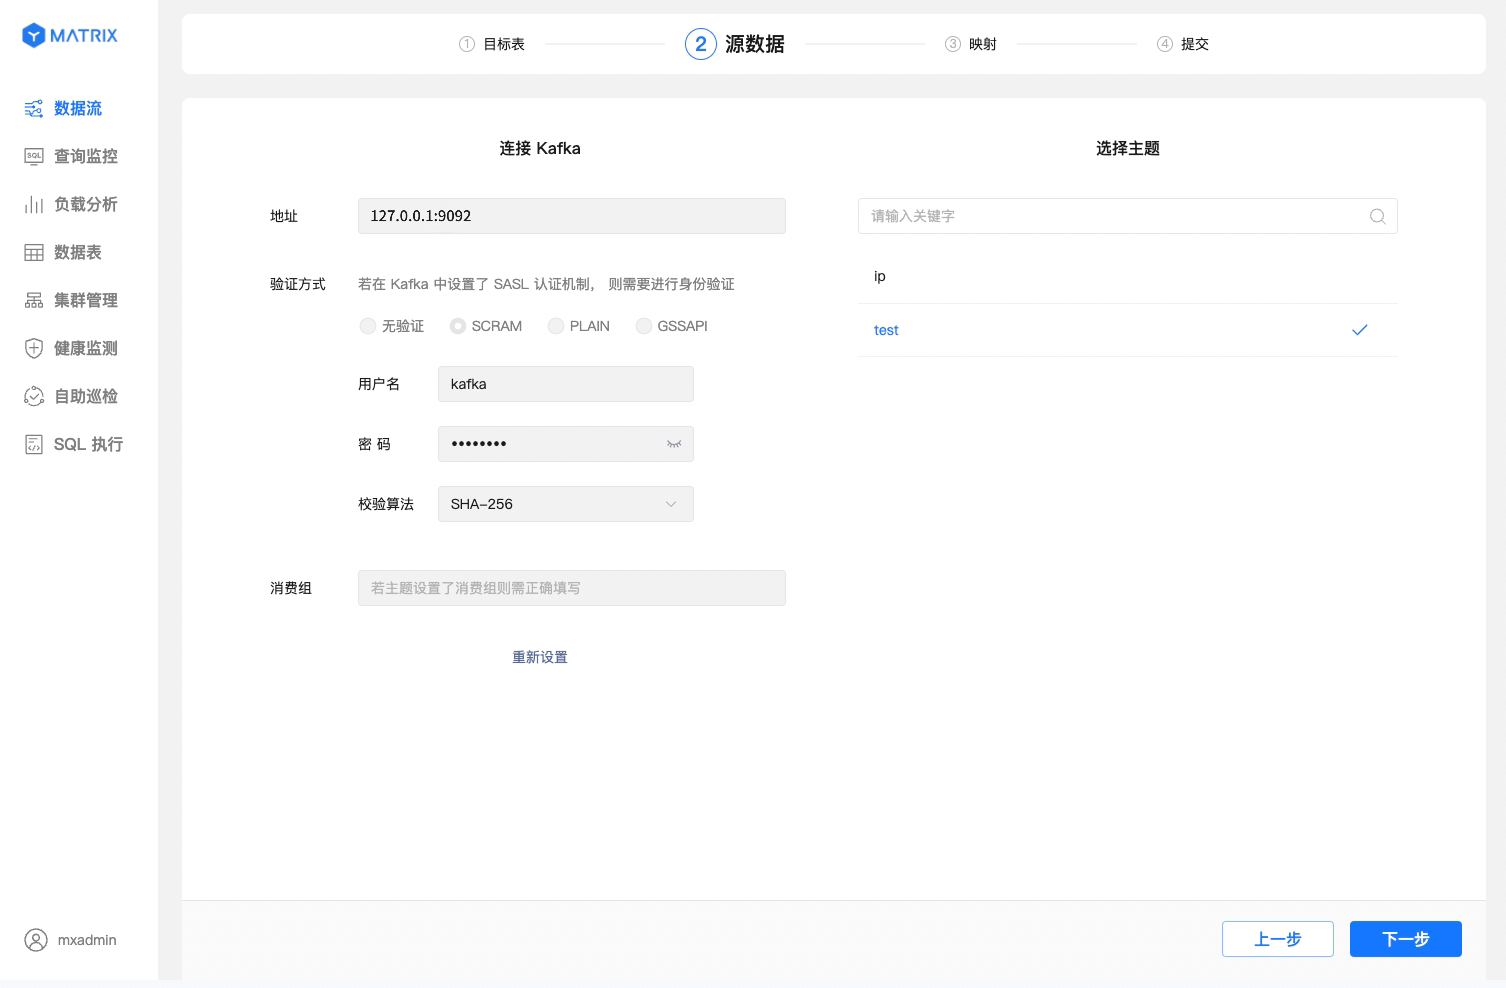
The address and authentication information can be saved as a "Kafka profile" for repeated use: after filling them in, click "Save as profile", enter a profile name, and save. When you create a data stream later, you can directly select a saved profile; the interface displays "Using profile:

When GSSAPI is selected as the Auth method, you need to upload keytab and Kerberos files:

If the GSSAPI connection fails, check the DisablePAFXFAST option in the authentication area: when enabled, GSSAPI fast authentication (PAFXFAST) is not used. Some Kerberos environments require disabling fast authentication to connect.
The third step configures the Sample data and maps the existing or new table to ingest Kafka data.
2.1.3.1 Basic Configuration
Select the CSV source data format and specify or configure the Sample data. You need to specify or manually configure the sample data format to ensure accurate mapping.
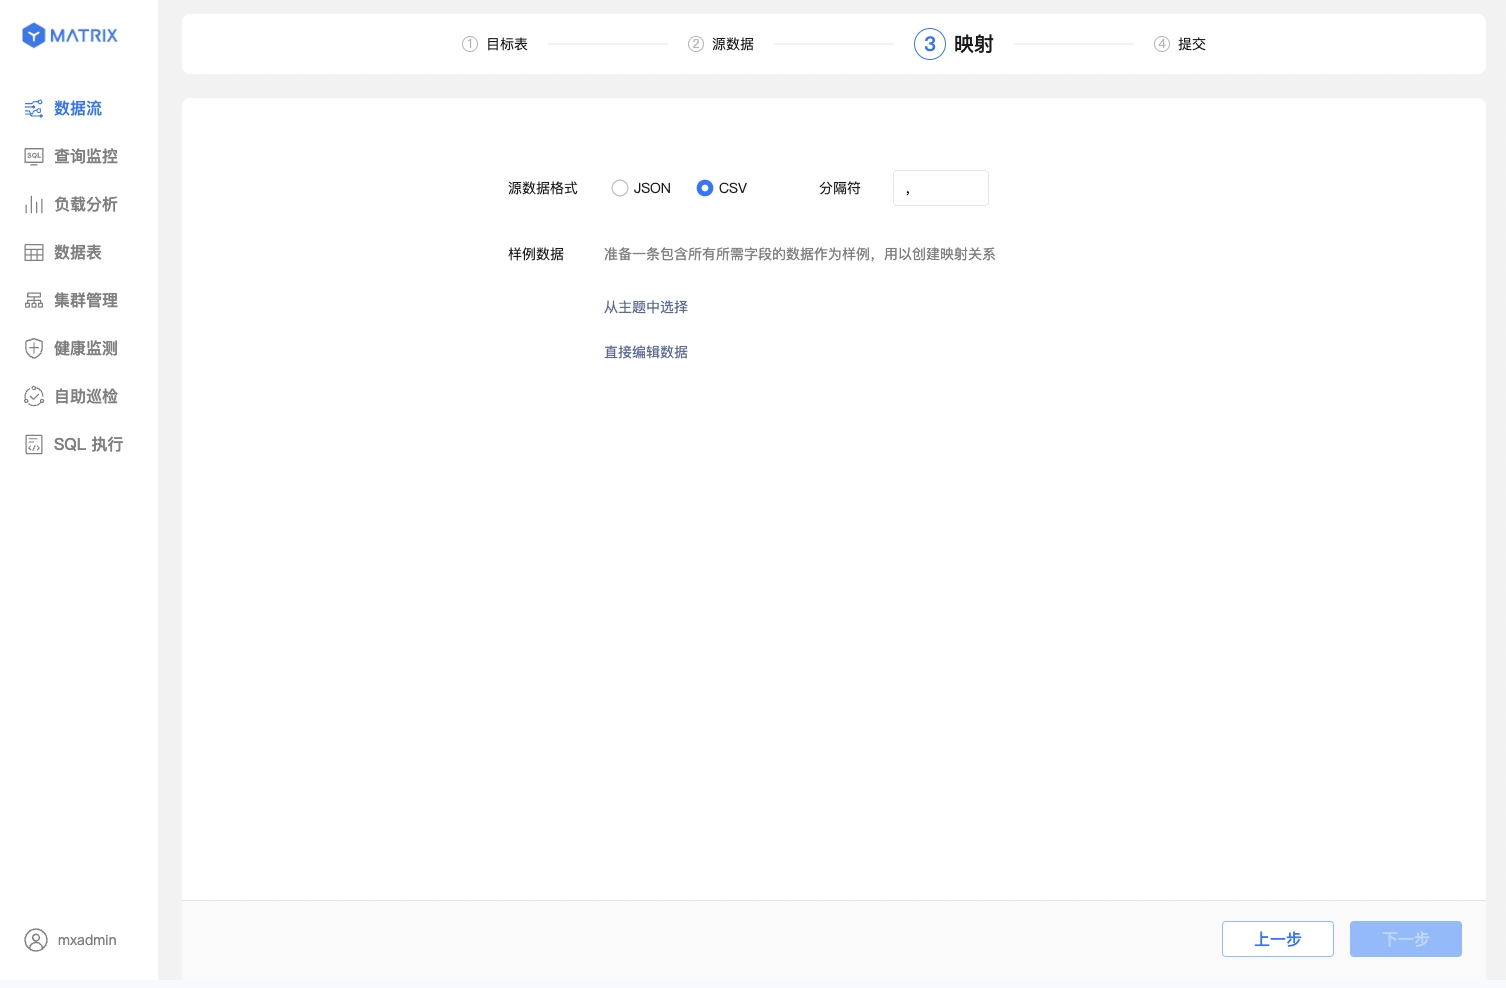
When configuring the Sample data, you can Select from topic or Edit data directly.
Edit data directly and provide one sample record following the field structure of the target table. The sample data is used only for parsing and mapping the field structure; it is not imported into the target table.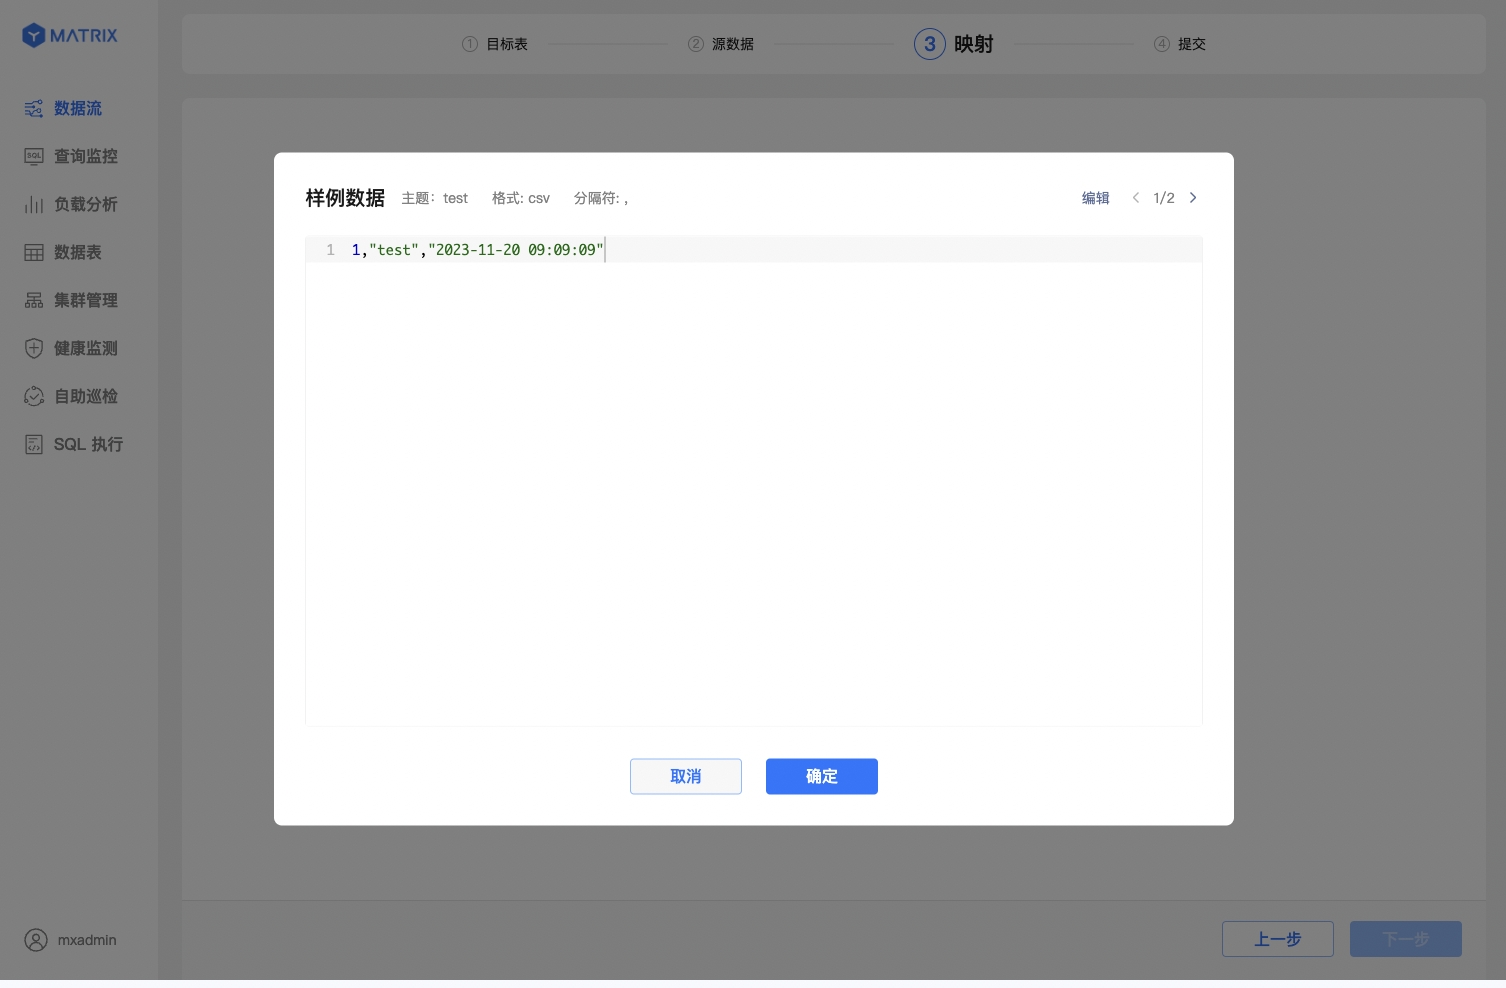
Note!
Tables created through the GUI use the MARS3 storage engine by default. For more information, see MARS3.
2.1.3.2 Perform Mapping
After the basic mapping configuration is complete, map the source data fields to the target table fields. The operations differ between existing tables and new tables.
Mapping an existing table
First select a Sample data record, then find the corresponding target field in the mapping relationship. Click Save after the settings are complete to establish a mapping.
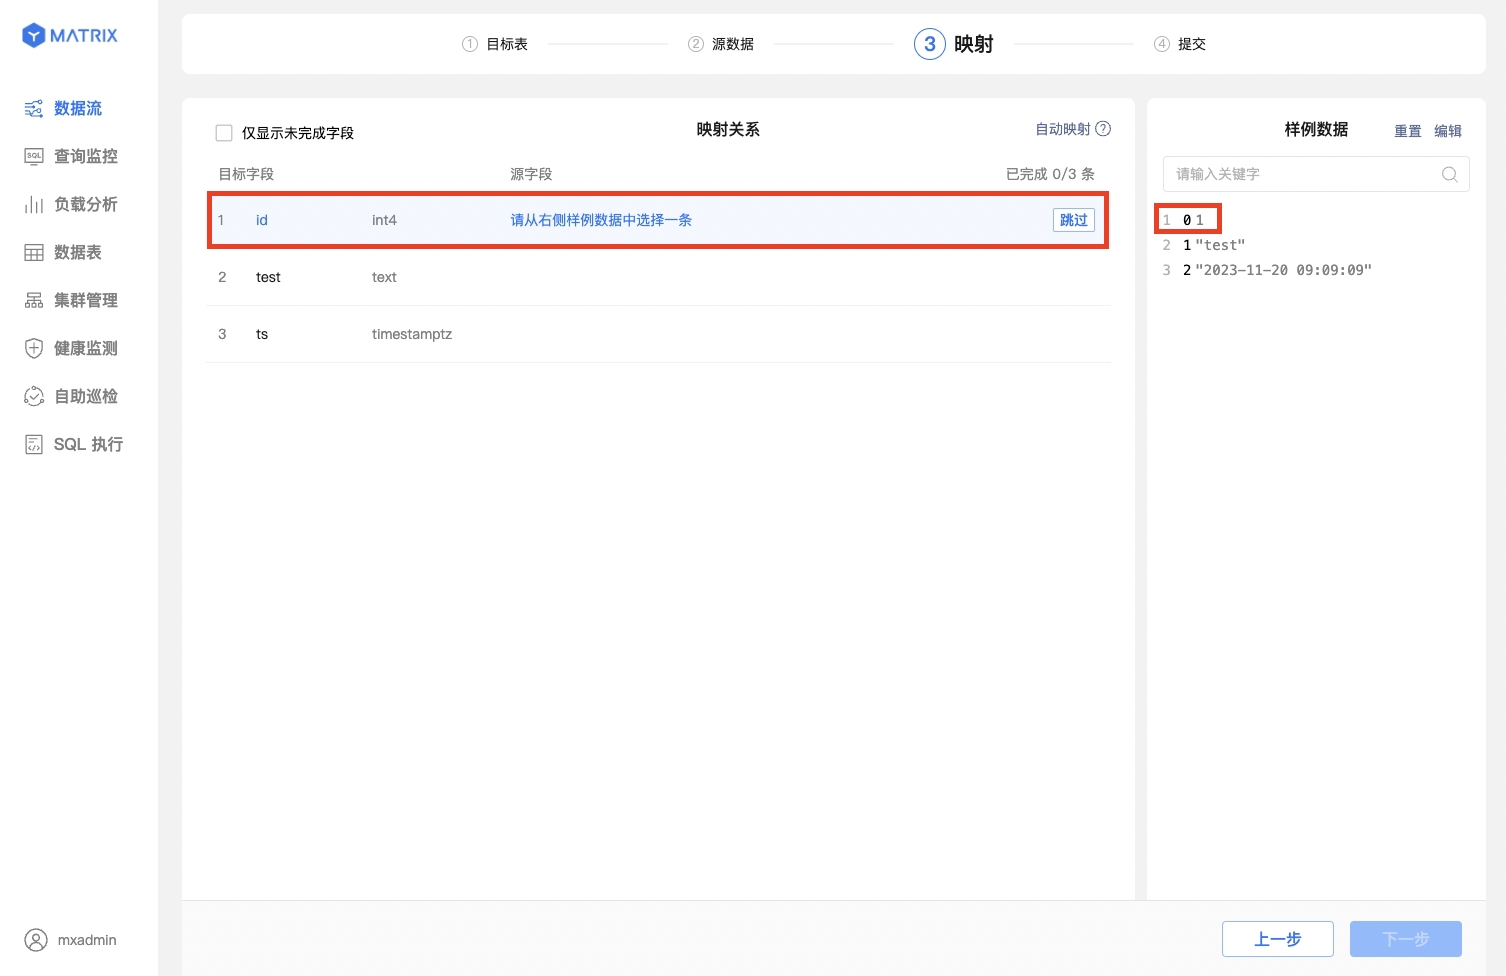
You can also perform one-click Automatic mapping, which is convenient while keeping the mapping correct. Starting from 6.8.4, field names generated by Automatic mapping drop redundant underscores for better readability.

After Automatic mapping is complete, the mapping relationship displays the output value column by column, and you can Clear or Edit at any time:

Mapping a new table
In addition to establishing mapping rules, a new table requires attention to the following settings:
When the source field value is a UNIX timestamp and the target field type is timestamptz, a Store as timestamp checkbox appears to the right of the output value. When this checkbox is selected, the output value is automatically converted to the database timestamp format.
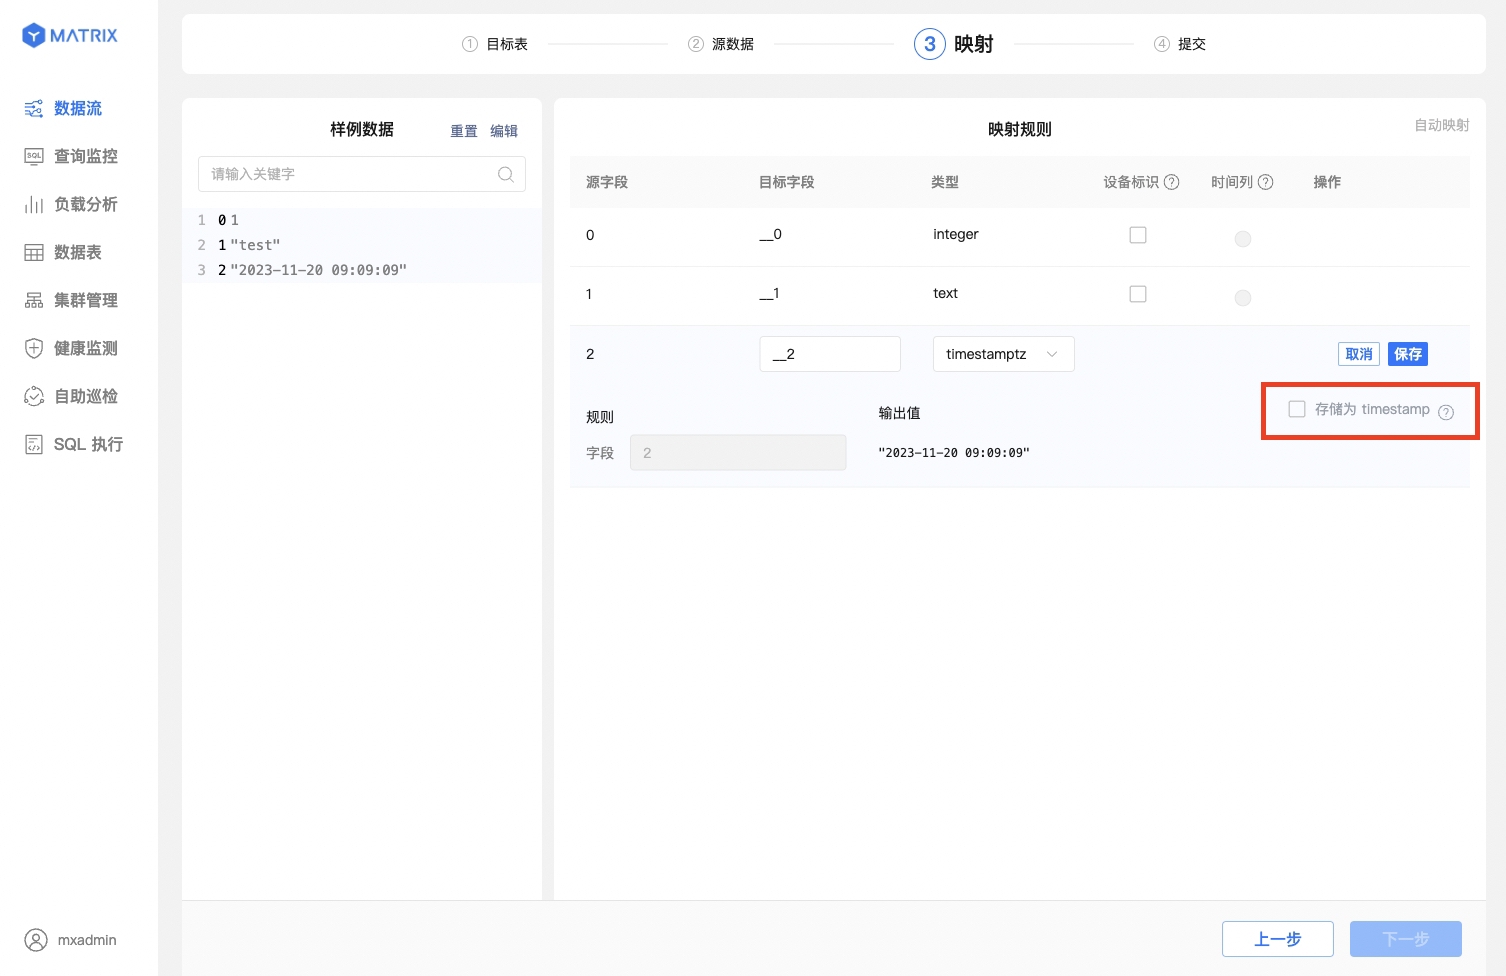
After the mapping rules are saved, two settings must also be confirmed: "Device ID (unique identifier)" and "Time column":
timestamptz); a non-partitioned table does not need a time column.
The mapping page of a new table has one more column than that of an existing table: "Device ID (unique identifier)":

Finally, review all configuration information of the data stream. If anything is wrong, go back and fix it; if everything is correct, submit.
2.1.4.1 Existing Table
The page displays all configuration information of the data stream. After confirming the information, click the "Submit" button.
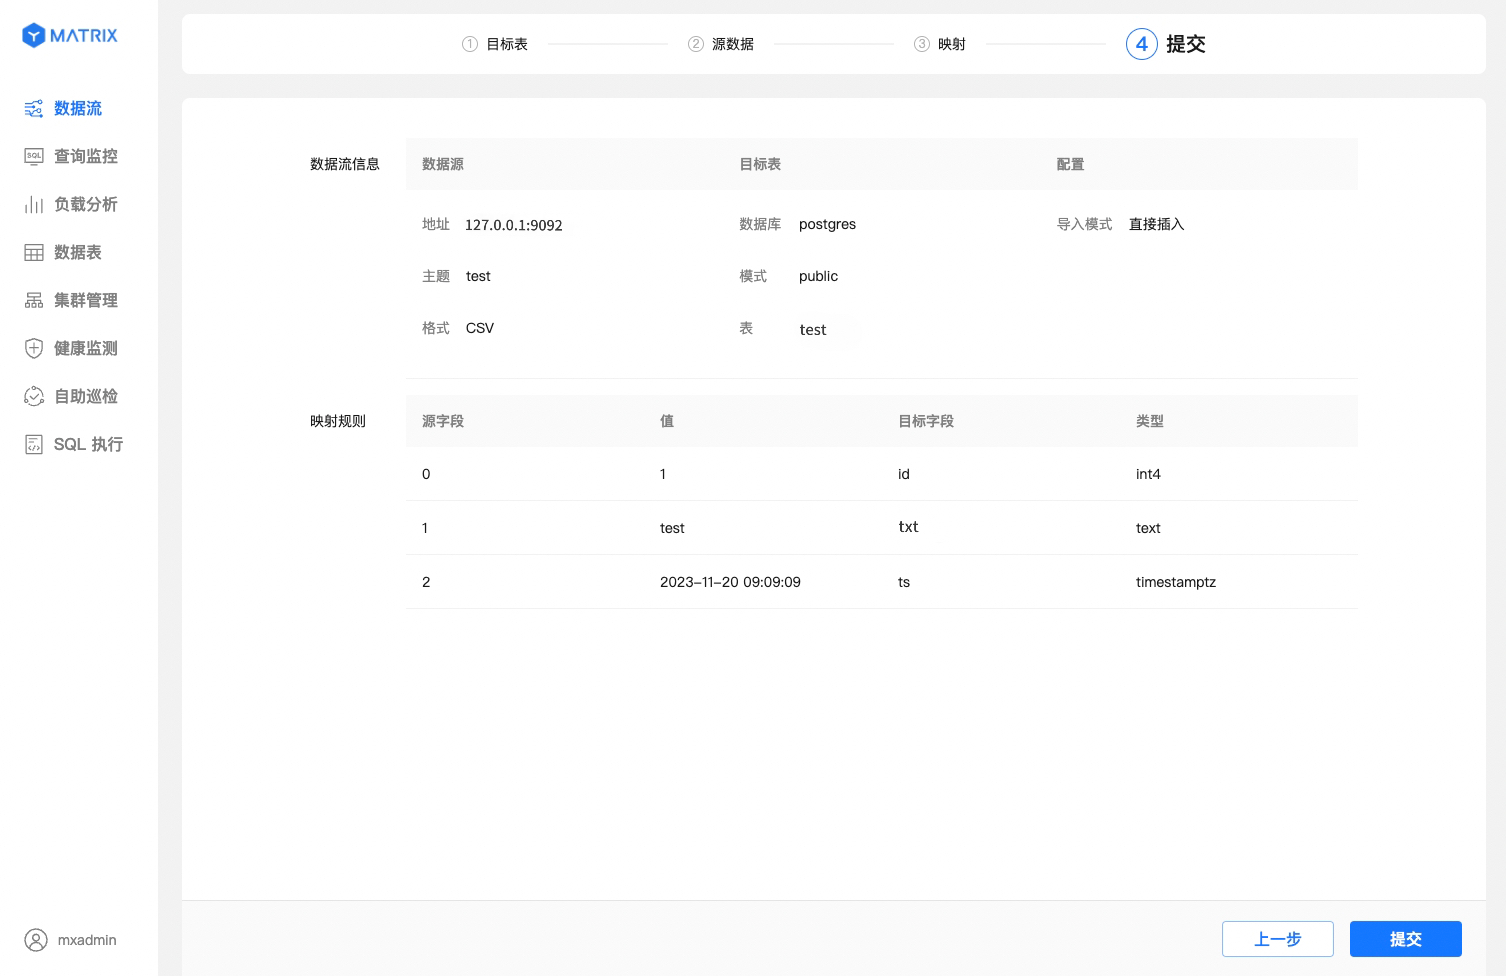
2.1.4.2 New Table
Compared with an existing table, it additionally displays unique identifier information: for a partitioned table it is the combination "Device ID + Time column"; a non-partitioned table displays no unique identifier information. After confirming the information, click the "Submit" button.
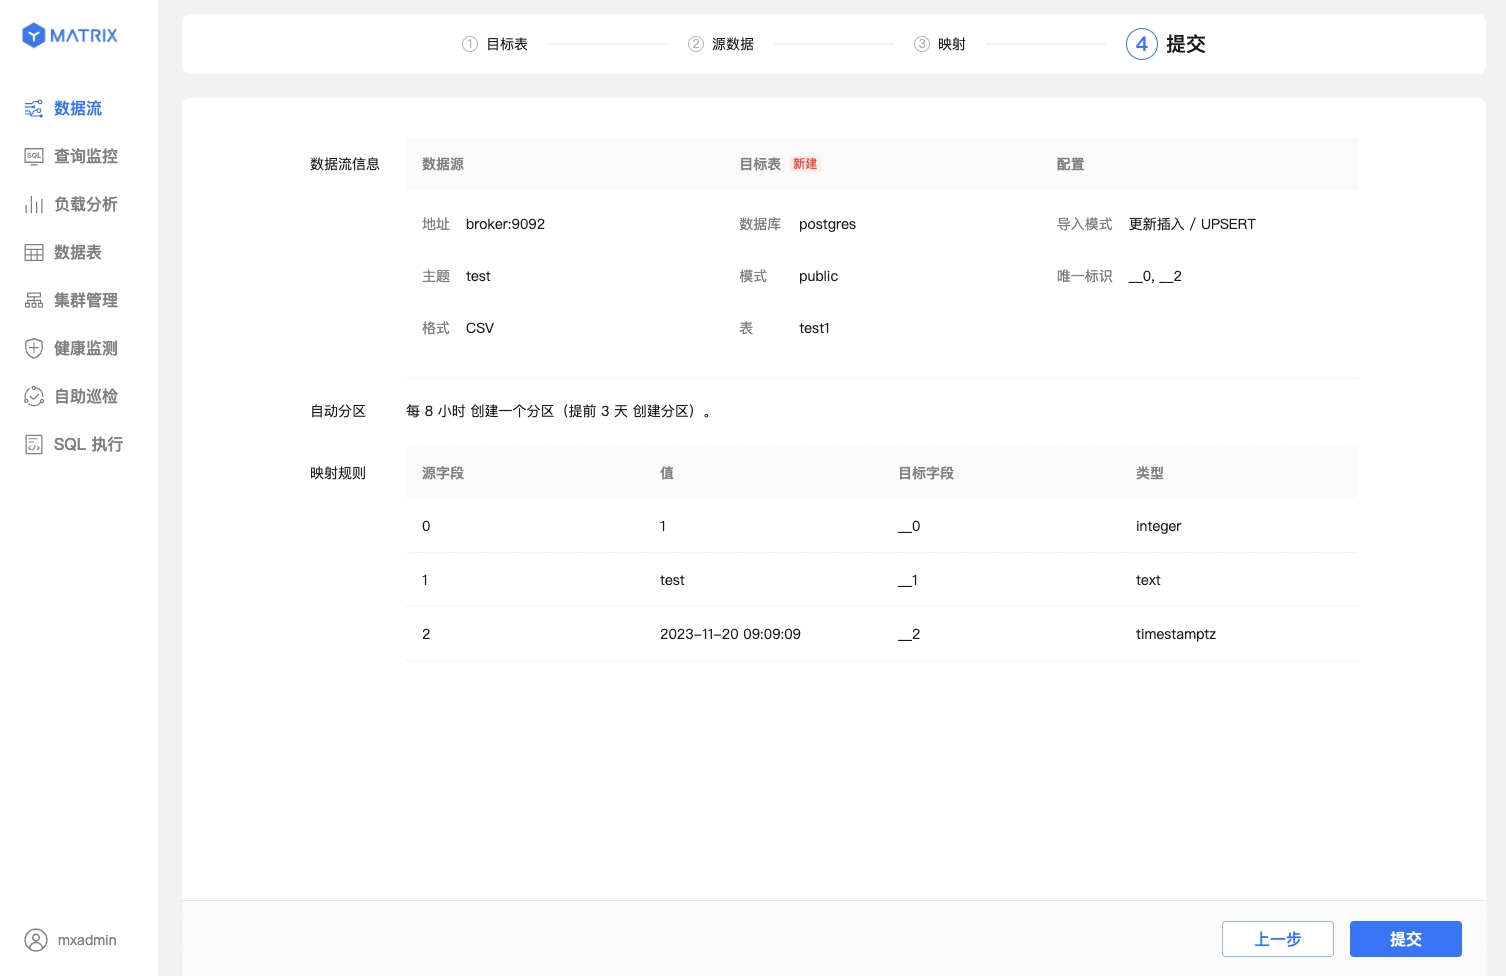
The submission page in 6.8.4 also displays the Table type and Importing mode of the target table:

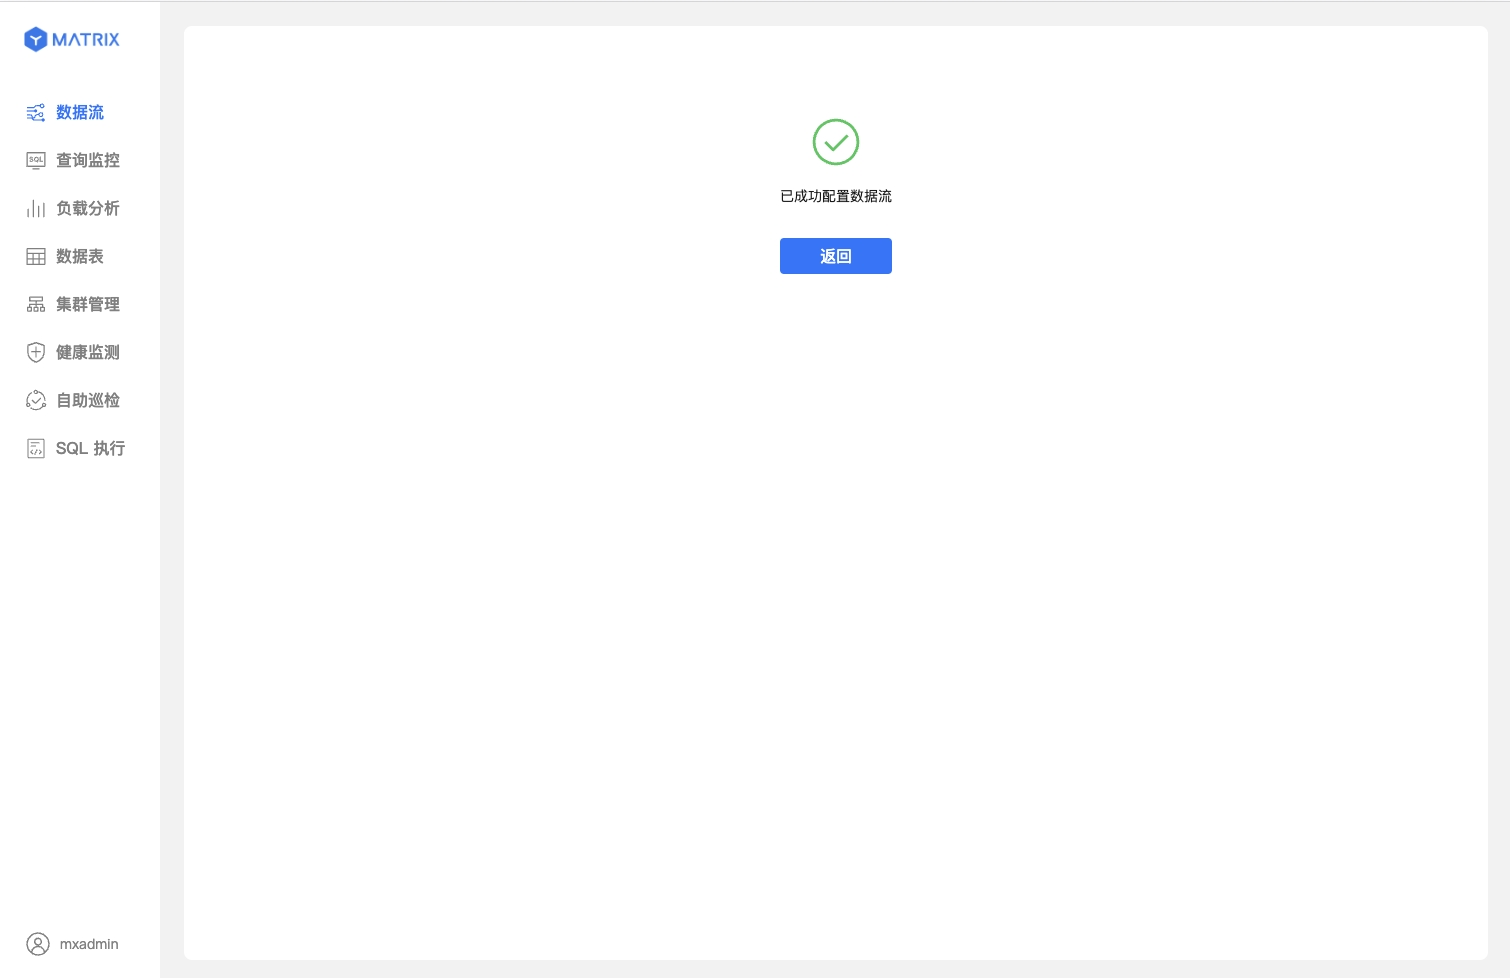
Whether for an existing table or a new table, a success page appears after a successful submission, and the Kafka data stream has been created successfully.
This section mainly describes the differences from CSV ingestion, which are concentrated in the Mapping step.
First, select the JSON data format and configure the sample data.
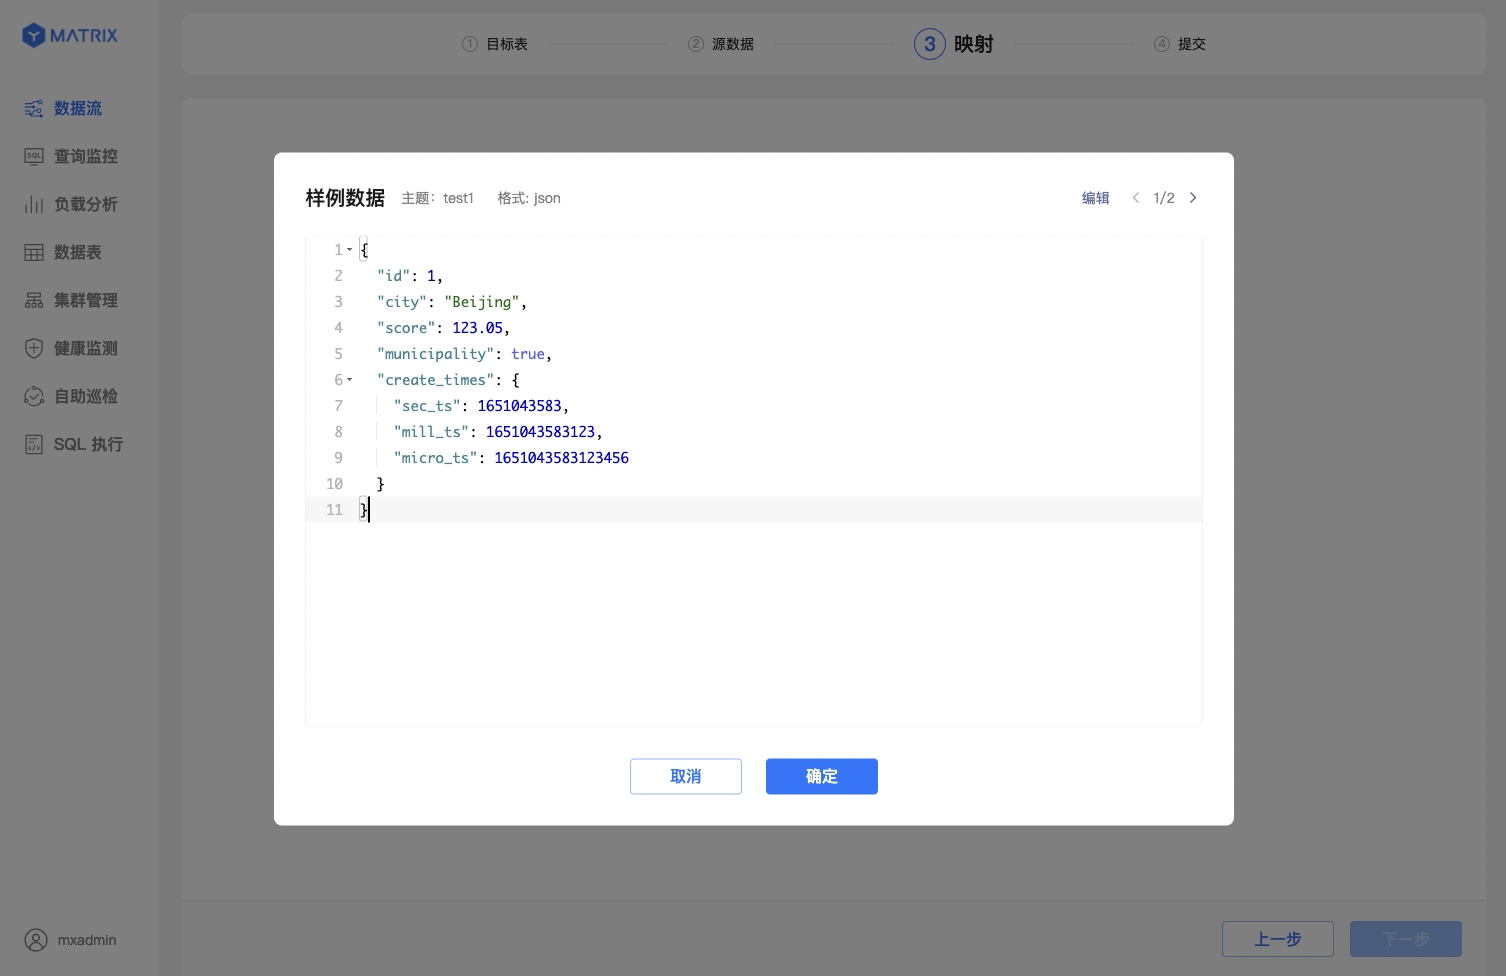
Second, JSON columns are indexed with the $["column_name"] semantics. For the indexing rules, refer to JSONPath.
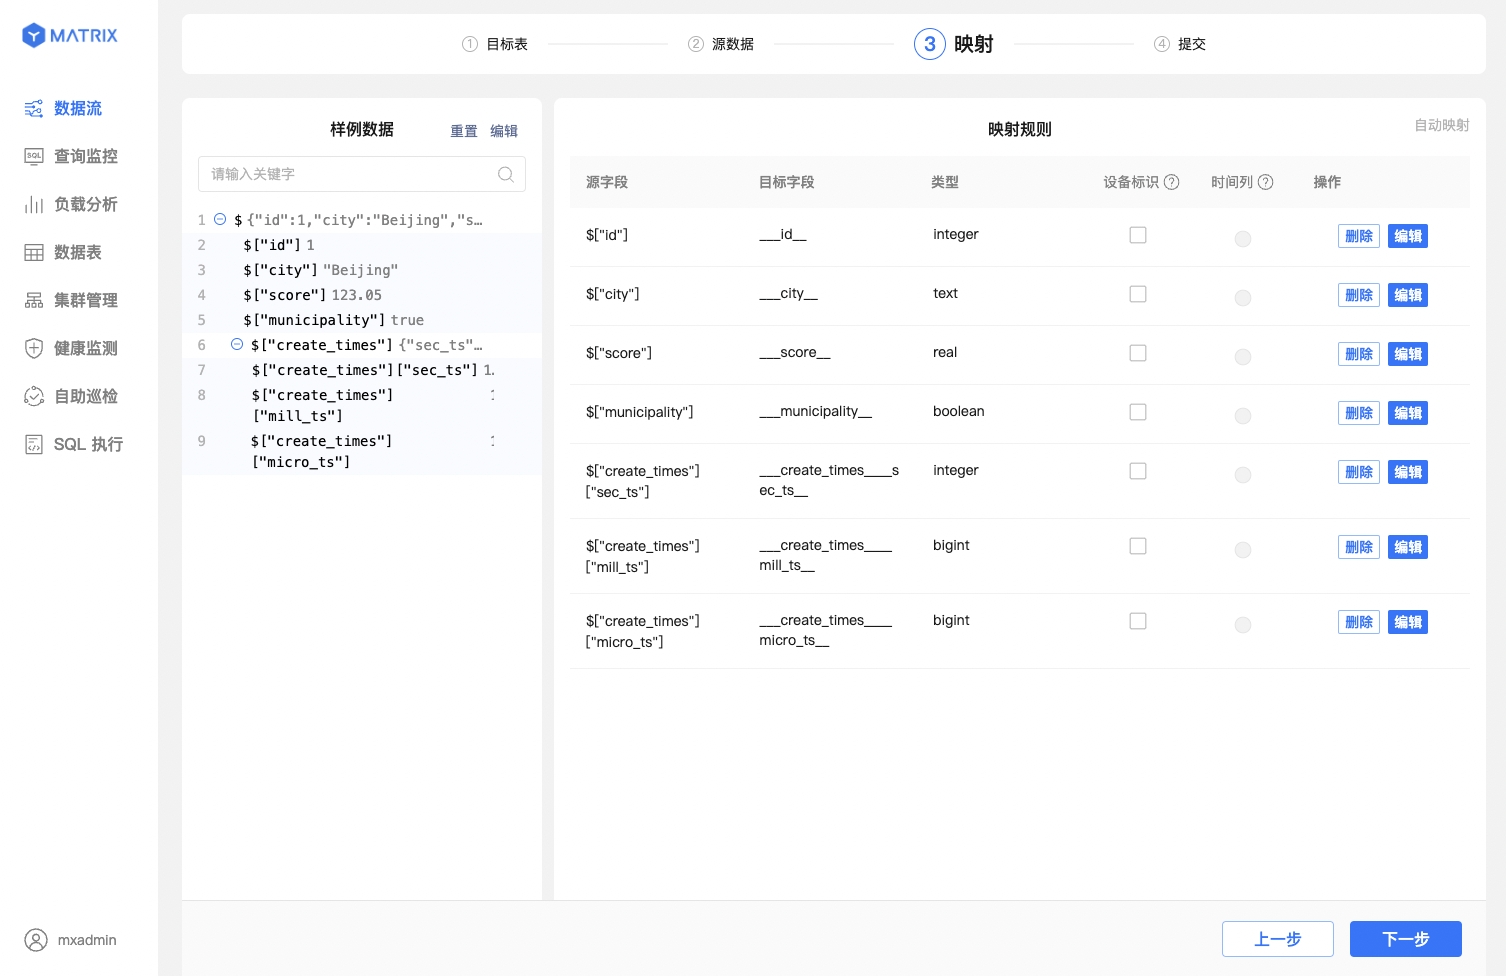
Finally, JSON data supports multi-level nesting. YMatrix supports selecting source data fields at different levels to create mapping rules. Click ⊕ in the Sample data column to expand the nested levels.
After you create a Kafka data stream with the YMatrix GUI, data is continuously imported into YMatrix. If the import needs to be interrupted temporarily, for example for service debugging, you can pause or stop the task in the GUI, and later resume or start it.
For a running Kafka data stream, you can manage ingestion from two entrances: the Processes view and the Tasks view. The Processes view manages all tasks under a MatrixGate process, and the Tasks view manages each task individually.
Note!
Stop and pause operations may take 1-10 seconds to take effect. Do not perform other operations on the data stream during that time. After pausing or stopping completes, Kafka data ingestion stops. After resuming or starting, the data stream resumes ingestion immediately, and the page displays the latest ingestion information within at most 5 seconds.
The Processes view lists, by MatrixGate process, the host name, PID, type, task status, throughput, and creation/exit time. Exited processes remain in the list.

"View" in the actions column opens the details page of the process, which contains three tabs: "Performance", "Active Tasks", and "Basic Information":

The "···" on a list row manages all tasks under the process, and can delete the process record from the list:

The expand button in the actions menu provides the Start, Reset offsets, Stop, and Remove task operations.
The task list displays only tasks that are "Active in: last 1 hour" by default. Switch the time filter to view earlier tasks.
If you need to re-consume from another position in Kafka, for example to re-import data after accidental deletion or to skip backlogged data, you can reset the consumer offsets of a stopped data stream. Supported since 6.8.4, this can be done in the Tasks view of the GUI, or with the mxgate offset-reset command.
Note!
Resetting offsets is an offline operation. Stop the task first, and confirm that all associated MatrixGate processes have exited before resetting offsets.
Note!
Re-consumption follows at-least-once delivery semantics. Make sure the target table can handle duplicate data, for example by using UPSERT or deduplicate mode.
Stop the target task in the Tasks view.
Click "Reset offsets". On the "Reset consumer offsets" page, select where to re-consume from:
0:100,1:200
When "First message at or after a date and time" is selected, specify a date and time:

Click "Generate plan" to view the topic, consumer group, Target table, Retained start, Log end, Consumed to, Consume from, Catalog rows to purge, and other information. After confirming that everything is correct, click "Confirm reset".

After the reset completes, start the task in the Tasks view to continue consuming from the new offsets.
mxgate offset-reset resets the consumer offsets of a stopped data stream. The command reads the data stream configuration from the configuration file specified by -C; it uses the file only to locate the data stream and does not modify it.
Prerequisites
Specifying the Target Position (exactly one of the four methods must be specified)
| Parameter | Description |
|---|---|
--to-earliest |
Reset to the earliest offset still retained by Kafka |
--to-latest |
Reset to the log end, skipping backlogged data |
--to-datetime <time> |
Reset to the first message at or after that time. The time uses the RFC3339 format with a time zone, for example 2026-08-28T10:00:00+08:00 |
--to-offsets <partition:offset,...> |
Specify offsets by partition, for example 0:100,1:200 |
Selecting the Data Stream to Reset
--topic, --consumer-group, and --job are used only to match an existing data stream in the configuration file; they do not override or assemble configuration.
--topic, --consumer-group, and --job to specify exactly one of them. A simple consumer has no consumer group; omit --consumer-group.Other Parameters
| Parameter | Description |
|---|---|
-C, --config |
Configuration file of the data stream |
--dry-run |
Show the plan only, without modifying any data |
-y, --yes |
Skip interactive confirmation; suitable for automation |
--output |
Output format: text or json. json writes only a single object to stdout and must be used with --dry-run or -y |
Example: Preview the Plan
When the configuration file contains only one data stream, no selection parameters are needed:
$ mxgate offset-reset -C mxgate.conf --to-earliest --dry-runThe command first warns that this is an offline operation, and then shows the plan. The following output is an example; actual output depends on your environment:
offset-reset is an offline command. Before continuing, make sure that
  - every mxgate instance running this flow is stopped and its process has exited;
  - nothing restarts it (systemd, Kubernetes, ...) until this command has succeeded or you have recovered from its error.
Only the consumer group is checked for live members; a simple consumer that is still running cannot be detected.

Offset reset plan of topic csv_test (job job_csv_to_public.demo_csv -> "public"."demo_csv", consumer group "", mode earliest):

partition  kafka-oldest   kafka-newest   consumed-to      consume-from   purge-rows
0          0              4              3                0              1

dry-run: nothing has been changed
Each row in the plan corresponds to one partition: kafka-oldest and kafka-newest are the offset range retained by Kafka, consumed-to is the currently consumed position, consume-from is where consumption starts after the reset, and purge-rows is the number of records that this reset removes from the consumption progress.
Example: Perform the Reset
When the configuration file contains multiple data streams, specify one with the selection parameters, and use -y to skip interactive confirmation:
$ mxgate offset-reset -C mxgate.toml \
    --topic orders \
    --consumer-group mxgate-orders \
    --job j_orders \
    --to-offsets '0:100' \
    -y
Execution and Recovery
--to-offsets recovery parameters. Complete the recovery as prompted, and do not start the data stream until the Kafka offsets are confirmed to be aligned.Scope of Impact
reset_id.

