YMatrix supports access to data in HDFS through PXF (Platform Extension Framework). Through PXF, YMatrix can read structured or semi-structured data on HDFS in parallel, avoiding redundancy and delay caused by data migration, and achieving a "connected and ready-to-use" data analysis experience.
This section includes two access methods: PXF Direct Access HDFS and PXF Access HDFS through Ranger for users to choose from. The latter can enable permission settings for HDFS file access through Ranger. Users can directly click on jump to the corresponding chapter for query.
If PXF is not installed, you can refer to the PXF Installation chapter for installation.
This section will provide detailed information on how to configure and use PXF to access HDFS in YMatrix.
| Software | Version Information |
|---|---|
| YMatrix | MatrixDB 6.2.2+enterprise |
| Hadoop | Hadoop 3.2.4 |
| PXF | pxf-matrixdb4-6.3.0-1.el7.x86_64 |
(I) Create folders in Hadoop (executes by Hadoop master node)
First, we need to create some directories on HDFS to store data files. These directories will serve as data exchange locations between YMatrix and Hadoop clusters.
/greenplum directory under the HDFS root directory. This directory is used to store all database-related data files. It can be created with the following command:hdfs dfs -mkdir /greenplumpxf_examples subdirectory under /greenplum. This subdirectory is used to store PXF sample data. Create this subdirectory with the following command:hdfs dfs -mkdir /greenplum/pxf_examples
/greenplum has been created. Use the ls command to list the root directory contents to ensure that the new directory is created successfully:hdfs dfs -ls //greenplum directory and verify that pxf_examples has been created.hdfs dfs -ls /greenplum/
echo 'Prague,Jan,101,4875.33
Rome,Mar,87,1557.39
Bangalore,May,317,8936.99
Beijing,Jul,411,11600.67' > pxf_hdfs_simple.txt
/greenplum/pxf_examples directory of HDFS.hdfs dfs -put pxf_hdfs_simple.txt /greenplum/pxf_examples/hdfs dfs -cat /greenplum/pxf_examples/pxf_hdfs_simple.txtmxadmin user through the hdfs dfs -chown command:hdfs dfs -chown -R mxadmin:mxadmin /greenplum/pxf_examples/pxf_hdfs_simple.txt(II) Configure environment variables under mxadmin user (added by all YMatrix nodes)
To ensure that YMatrix can interact effectively with Hadoop clusters, all YMatrix nodes need to configure relevant environment variables.
.bashrc or environment configuration file, add the following:export HADOOP_HOME=/opt/modules/hadoop-3.2.4
export HADOOP_CONF_DIR=/opt/modules/hadoop-3.2.4/etc/hadoop
export PXF_CONF=/usr/local/pxf-matrixdb4
export PATH=$PATH:$HADOOP_HOME/bin:$HADOOP_HOME/sbin:$PATH(III) Add mxadmin user access permissions to the Hadoop cluster (modify all Hadoop nodes)
To ensure that the mxadmin user has access to the Hadoop cluster, it is necessary to set it accordingly in the core-site.xml configuration file of all Hadoop nodes.
core-site.xml file and add the following configuration:<property>
<name>hadoop.proxyuser.mxadmin.groups</name>
<value>*</value>
</property>
<property>
<name>hadoop.proxyuser.mxadmin.hosts</name>
<value>*</value>
</property>(IV) Create single_hdfs folder (added by all YMatrix machines)
Create a new folder on the YMatrix master node to store the configuration files for the Hadoop cluster.
mkdir /usr/local/pxf-matrixdb4/servers/single_hdfs/(V) Copy the configuration file from the Hadoop machine to the PXF folder (transfer the Hadoop master node to the YMatrix master node)
Transfer the Hadoop configuration file to the PXF directory of the YMatrix master node.
scp command to copy the Hadoop configuration file to the YMatrix master node:scp $HADOOP_CONF_DIR/core-site.xml 192.168.50.95:/usr/local/pxf-matrixdb4/servers/single_hdfs/
scp $HADOOP_CONF_DIR/hdfs-site.xml 192.168.50.95:/usr/local/pxf-matrixdb4/servers/single_hdfs/
scp $HADOOP_CONF_DIR/yarn-site.xml 192.168.50.95:/usr/local/pxf-matrixdb4/servers/single_hdfs/(VI) Create pxf-site.xml file (created by YMatrix master node)
Create a PXF configuration file pxf-site.xml on the YMatrix master node to ensure that the PXF service is properly connected to the Hadoop cluster.
vi /usr/local/pxf-matrixdb4/servers/single_hdfs/pxf-site.xml<?xml version="1.0" encoding="UTF-8"?>
<configuration>
</configuration>(7) Modify the fs.defaultFS configuration of core-site.xml as the IP of the node where Active NameNode is located, and synchronize the PXF configuration (executes by YMatrix master node)
Configure the fs.defaultFS property in the core-site.xml file to ensure that YMatrix is properly connected to the NameNode of the Hadoop cluster.
fs.defaultFS configuration<property>
<name>fs.defaultFS</name>
<value>hdfs://<namenode_ip>:9000</value>
</property>pxf cluster sync(8) Use the pxf plug-in to query in the YMatrix database (executes by YMatrix master node)
create extension pxf_fdw;CREATE SERVER single_hdfs FOREIGN DATA WRAPPER hdfs_pxf_fdw OPTIONS ( config 'single_hdfs' );CREATE USER MAPPING FOR mxadmin SERVER single_hdfs;CREATE FOREIGN TABLE pxf_hdfs_table (location text, month text, num_orders int, total_sales float8)
SERVER single_hdfs OPTIONS ( resource '/greenplum/pxf_examples/pxf_hdfs_simple.txt', format 'text', delimiter ',' );SELECT * FROM pxf_hdfs_table;(I)Create directory (Hadoop master node execution) Create a new directory on HDFS to store the data to be written.
hdfs dfs -mkdir /greenplum/pxf_dir_examples(II) Create external table (YMatrix master node execution)
Create an external table in YMatrix and point it to the new HDFS directory.
CREATE FOREIGN TABLE pxf_hdfsdir_table (location text, month text, num_orders int, total_sales float8)
SERVER hdfs_svr OPTIONS (resource '/greenplum/pxf_dir_examples', format 'text', delimiter ',' );(III) Write data (execute by YMatrix master node)
Insert data from YMatrix's existing external table pxf_hdfs_table into the newly created external table pxf_hdfsdir_table.
INSERT INTO pxf_hdfsdir_table SELECT * FROM pxf_hdfs_table ;(IV) Query Foreign Table to obtain all data in the directory (execute by YMatrix master node)
Execute the query command to verify that the data is successfully written to the new directory.
SELECT COUNT(*) FROM pxf_hdfsdir_table;This section will provide detailed information on how to use PXF to manage access to HDFS files through Ranger.
First, we create some directories on HDFS to store data files. These directories will serve as data exchange locations between YMatrix and Hadoop clusters.
(I) Create the /ranger directory under the HDFS root directory
This directory is used to store all database-related data files. You can create it with the following command:
hdfs dfs -mkdir /ranger(II) List the contents of the HDFS root directory and verify whether /ranger has been created
Use the ls command to list the root directory contents to ensure that the new directory is created successfully.
hdfs dfs -ls /(III) Generate test data files Create a test data file locally, you can use the following command.
echo "testuser,May,100,999.99" > /tmp/pxf_test_verify.txt
(IV) Upload the generated local files to the /ranger directory of HDFS
Use the hdfs dfs -put command to upload the local file to HDFS.
hdfs dfs -put -f /tmp/pxf_test_verify.txt /ranger/(V) Check the uploaded file content and verify that the upload is successful Use the following command to view the content of the file and confirm that the file upload is successful.
hdfs dfs -cat /ranger/pxf_test_verify.txt
To ensure that YMatrix can interact effectively with Hadoop clusters, all YMatrix nodes need to configure relevant environment variables.
In the .bashrc or environment configuration file of each YMatrix node, add the following.
export HADOOP_HOME=/opt/modules/hadoop-3.2.4
export HADOOP_CONF_DIR=/opt/modules/hadoop-3.2.4/etc/hadoop
export PXF_CONF=/usr/local/pxf-matrixdb4
export PATH=$PATH:$HADOOP_HOME/bin:$HADOOP_HOME/sbin:$PATHTo ensure that the mxadmin user has access to the Hadoop cluster, it is necessary to set it accordingly in the core-site.xml configuration file of all Hadoop nodes.
Edit the core-site.xml file and add the following configuration.
<property>
  <name>hadoop.proxyuser.mxadmin.groups</name>
  <value>*</value>
</property>

<property>
  <name>hadoop.proxyuser.mxadmin.hosts</name>
  <value>*</value>
</property>single_hdfs folder (added by all YMatrix machines)Create a new folder on the YMatrix master node to store the configuration files for the Hadoop cluster.
mkdir /usr/local/pxf-matrixdb4/servers/single_hdfs/Transfer the Hadoop configuration file to the PXF directory of the YMatrix master node.
Use the scp command to copy the Hadoop configuration file to the YMatrix master node.
scp $HADOOP_CONF_DIR/core-site.xml 192.168.50.95:/usr/local/pxf-matrixdb4/servers/single_hdfs/
scp $HADOOP_CONF_DIR/hdfs-site.xml 192.168.50.95:/usr/local/pxf-matrixdb4/servers/single_hdfs/
scp $HADOOP_CONF_DIR/yarn-site.xml 192.168.50.95:/usr/local/pxf-matrixdb4/servers/single_hdfs/pxf-site.xml file (created by YMatrix master node)Create a PXF configuration file pxf-site.xml on the YMatrix master node to ensure that the PXF service is properly connected to the Hadoop cluster.
Use the following command to create and edit the pxf-site.xml file.
vi /usr/local/pxf-matrixdb4/servers/single_hdfs/pxf-site.xmlAdd the corresponding configuration content to the file.
<?xml version="1.0" encoding="UTF-8"?>
<configuration>
</configuration>fs.defaultFS configuration of core-site.xml to the node IP where Active NameNode is located, and synchronize the PXF configuration (executes by YMatrix master node)Configure the fs.defaultFS property in the core-site.xml file to ensure that YMatrix is properly connected to the NameNode of the Hadoop cluster.
fs.defaultFS configuration.<property>
<name>fs.defaultFS</name>
<value>hdfs://<namenode_ip>:9000</value>
</property>pxf cluster syncPXF interacts with HDFS through operating system users, not database users, while running in the background. Therefore, HDFS permission control in Ranger is based on the operating system user.
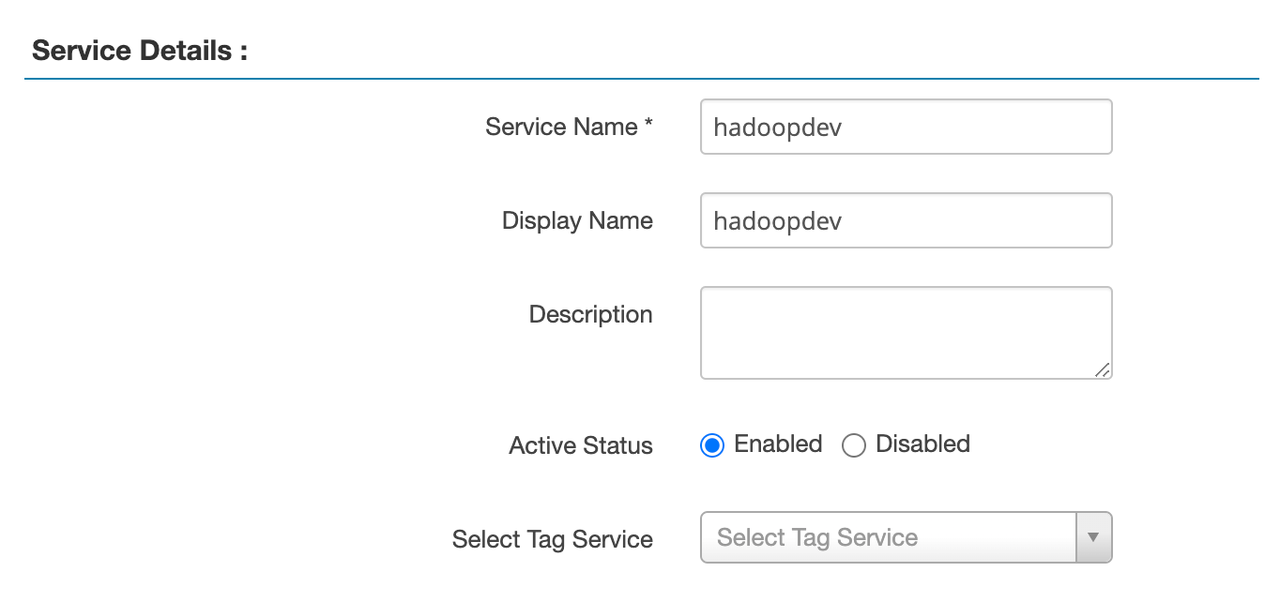 Username: root
Password: root password
Namenode URL: hdfs://hadoop01:9000 (Fill in according to the
Username: root
Password: root password
Namenode URL: hdfs://hadoop01:9000 (Fill in according to the core-site.xml file)
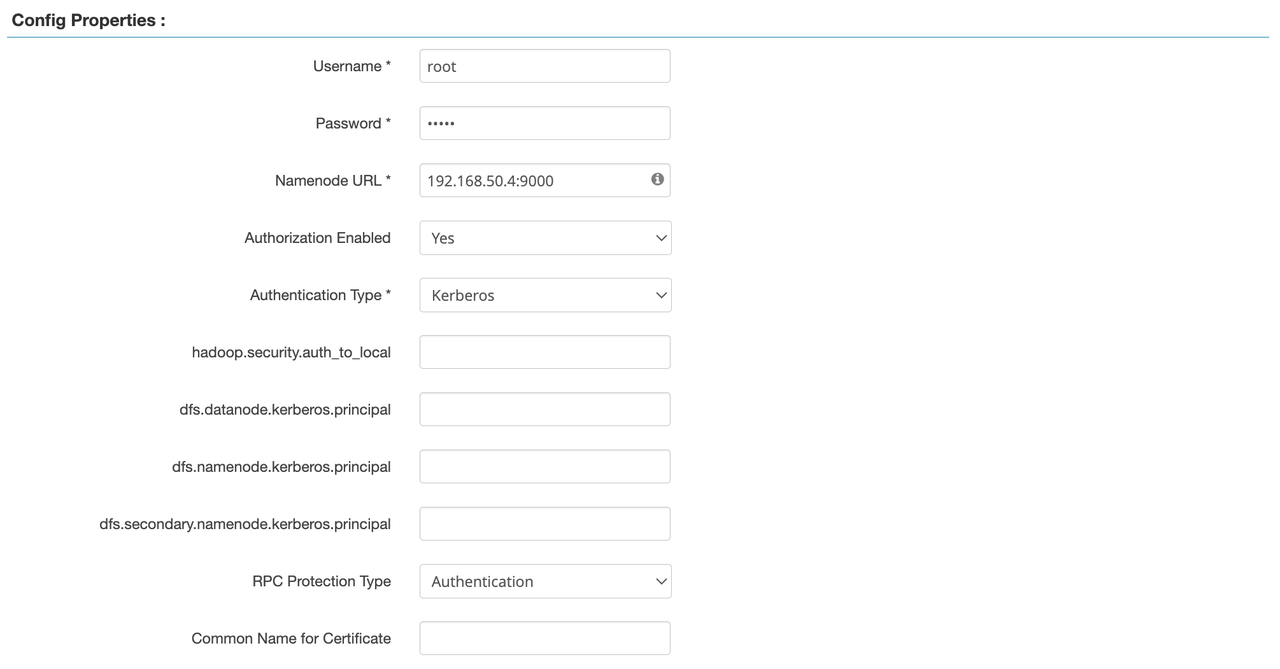
In Ranger, the difference between Kerberos and Simple is: Kerberos: Use tickets and encryption to authenticate, with high security and suitable for production environments, especially in scenarios where authentication across multiple systems is required.
Simple: Simple verification method based on username and password, low security, suitable for development or testing environments.
Save service configuration.
Note! After creating the Service, you need to restart Hadoop's Ranger Plugin to take effect!
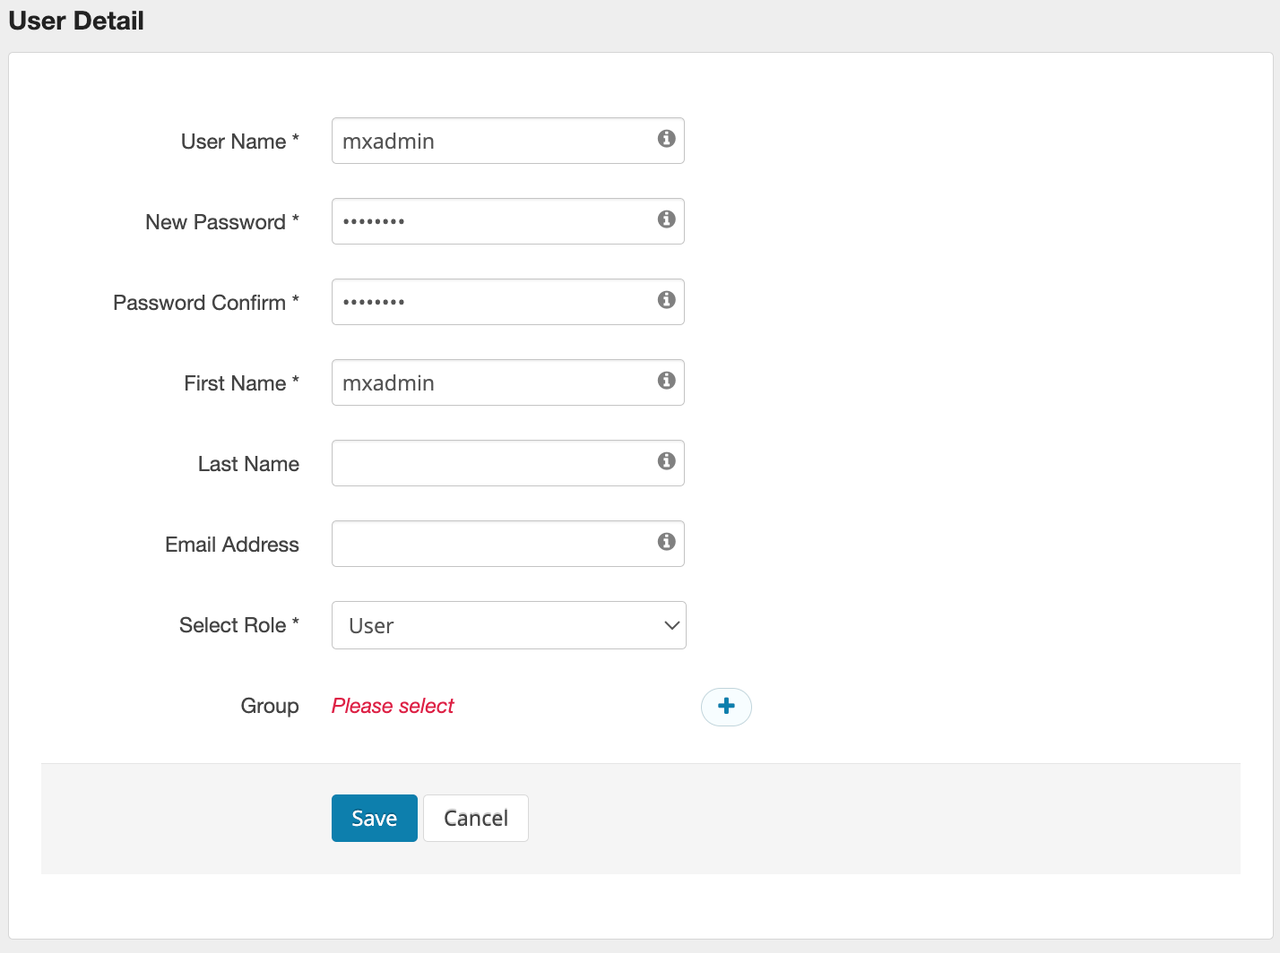
mxadmin user in Ranger(I) Enter the "User/Groups" page In the menu, select User / Groups and click Add New User
(II) Create mxadmin user
In the “User Name” input box, fill in mxadmin and select Save to save the user.
(III) Configure HDFS access rights for mxadmin user
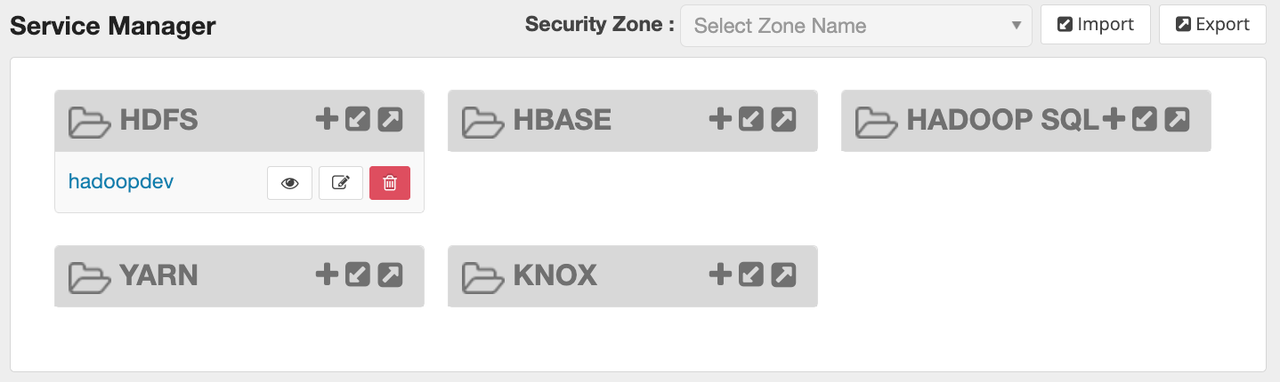
In Ranger, go to the hadoop_hdfs service and click Add New Policy.
The configuration is as follows:
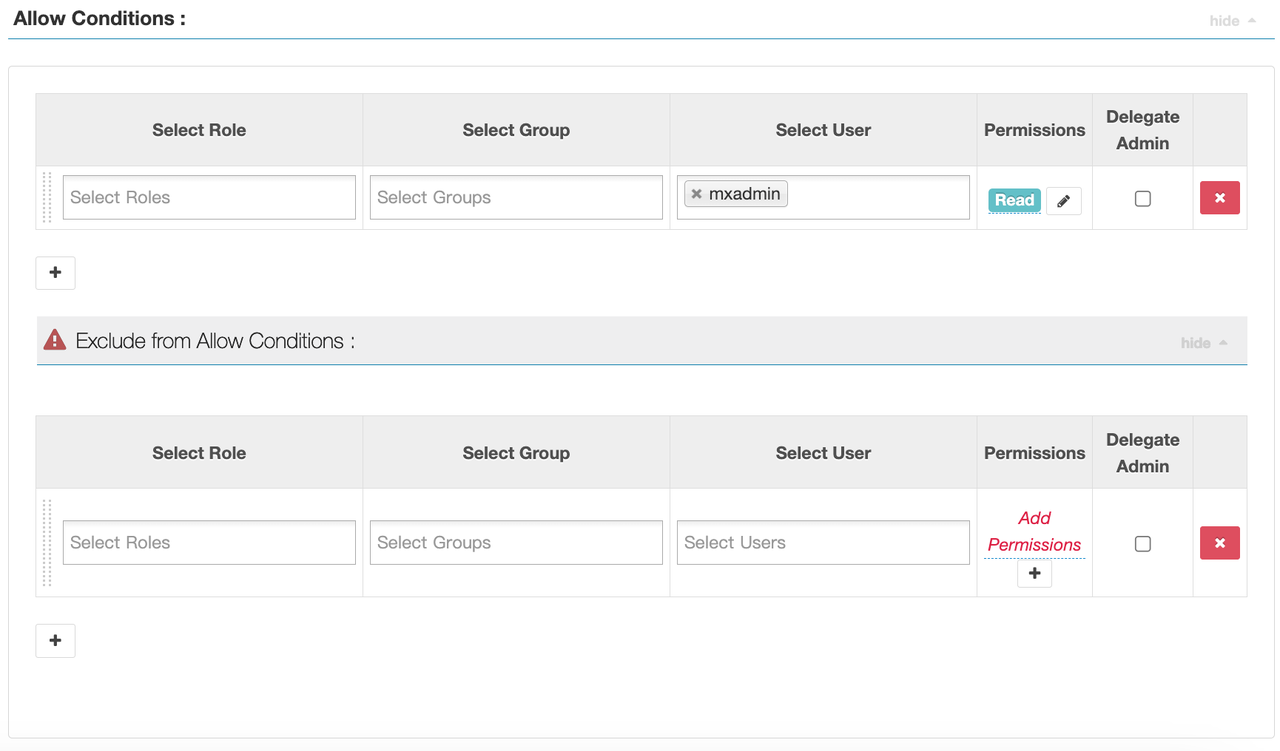
Policy Name: test_allow_mxadmin
Resource Path: /ranger/pxf_test_verify.txt
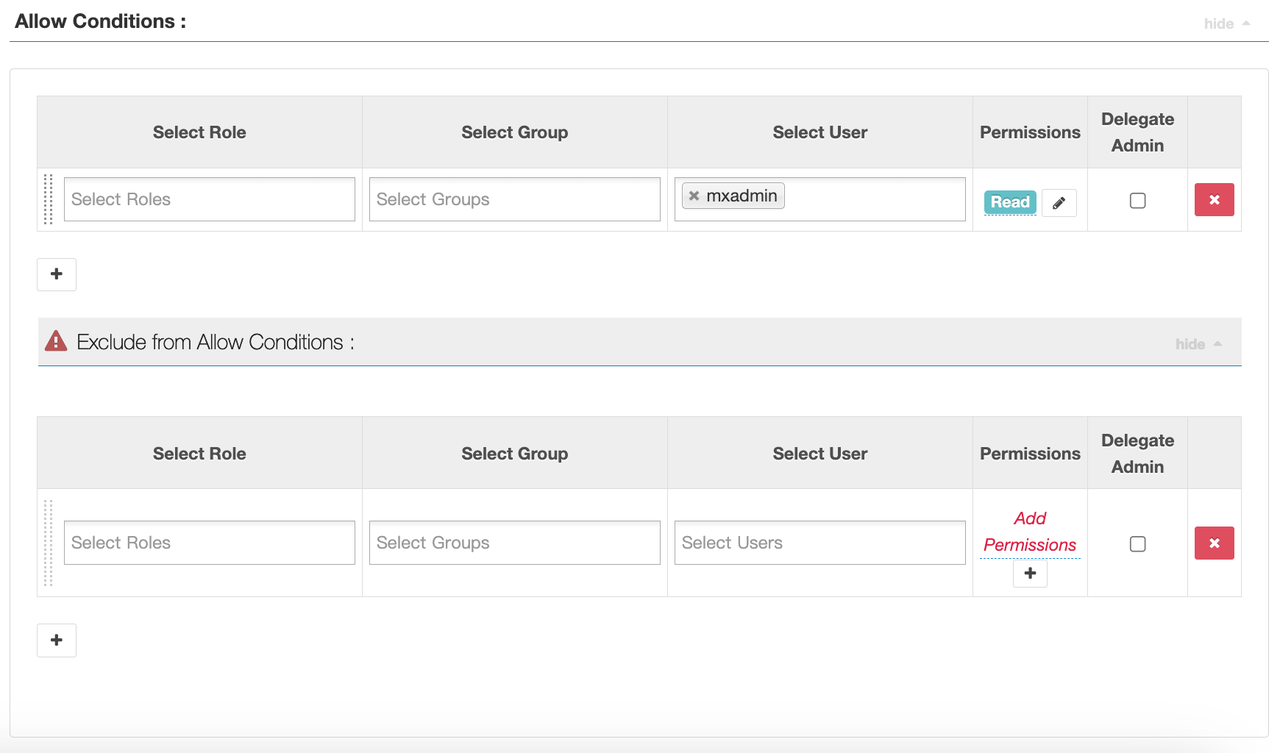
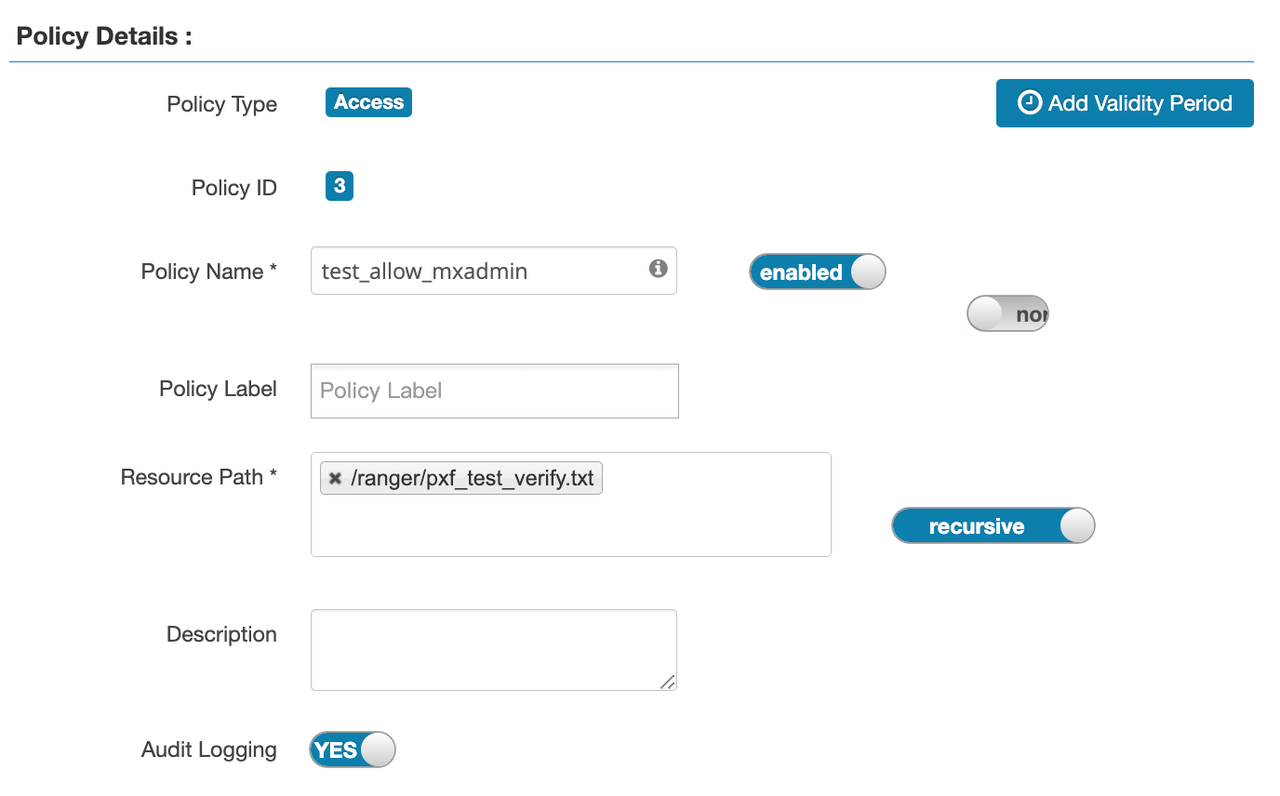 User:
User: mxadmin
Permissions : read
 Save the policy.
create database mxadmin;
#Switch to mxadmin library
\c mxadminEnable the PXF plug-in in YMatrix to allow YMatrix to access HDFS data.
Run the following command to create a PXF plug-in
create extension pxf_fdw;Create an external data source to connect to the file system of the Hadoop cluster.
Run the following SQL command to create an FDW Server:
CREATE SERVER single_hdfs FOREIGN DATA WRAPPER hdfs_pxf_fdw OPTIONS ( config 'single_hdfs' );Configure the mapping between YMatrix users and the FDW server and execute the following SQL commands.
CREATE USER MAPPING FOR mxadmin SERVER single_hdfs;Create an external table, map files on HDFS to the YMatrix database, and execute the following SQL command to create a Foreign Table:
CREATE FOREIGN TABLE pxf_hdfs_verify (
    name text,
    month text,
    count int,
    amount float8
)
SERVER single_hdfs
OPTIONS (
    resource '/ranger/pxf_test_verify.txt',
    format 'text',
    delimiter ','
);When ranger is configured with Deny Conditions
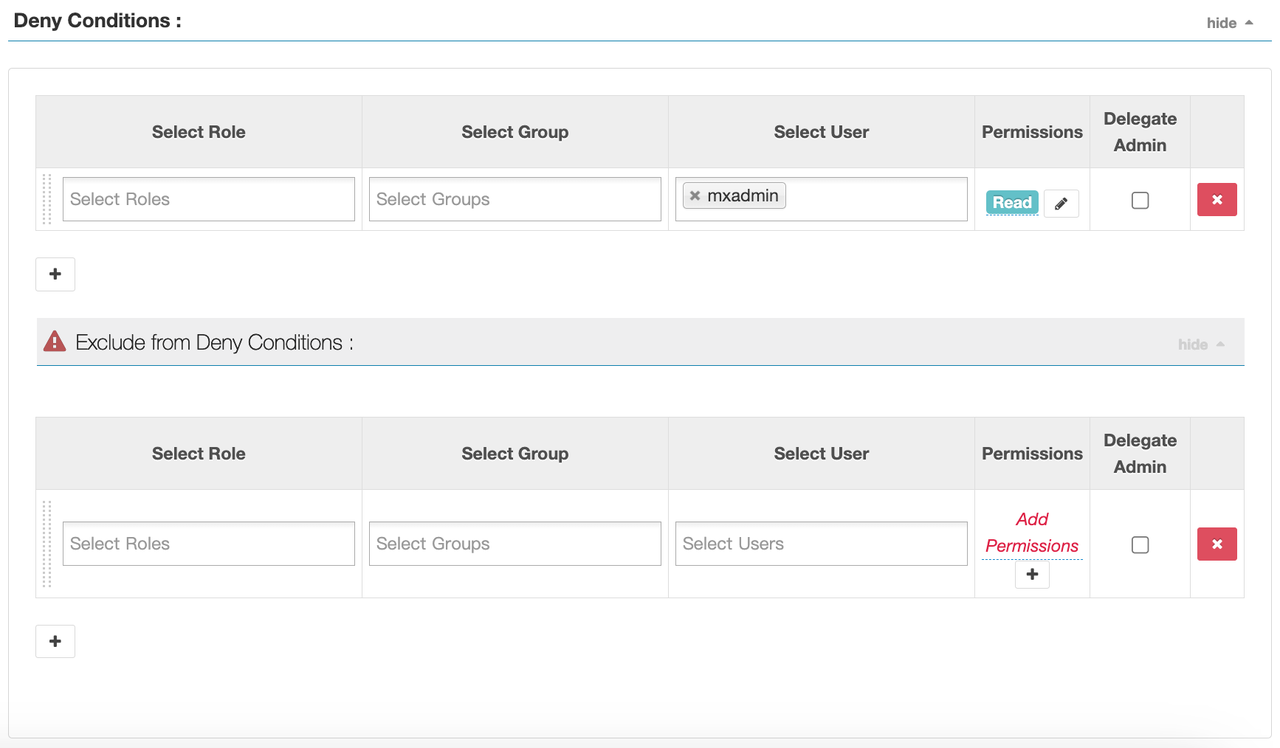
SELECT * FROM pxf_hdfs_verify;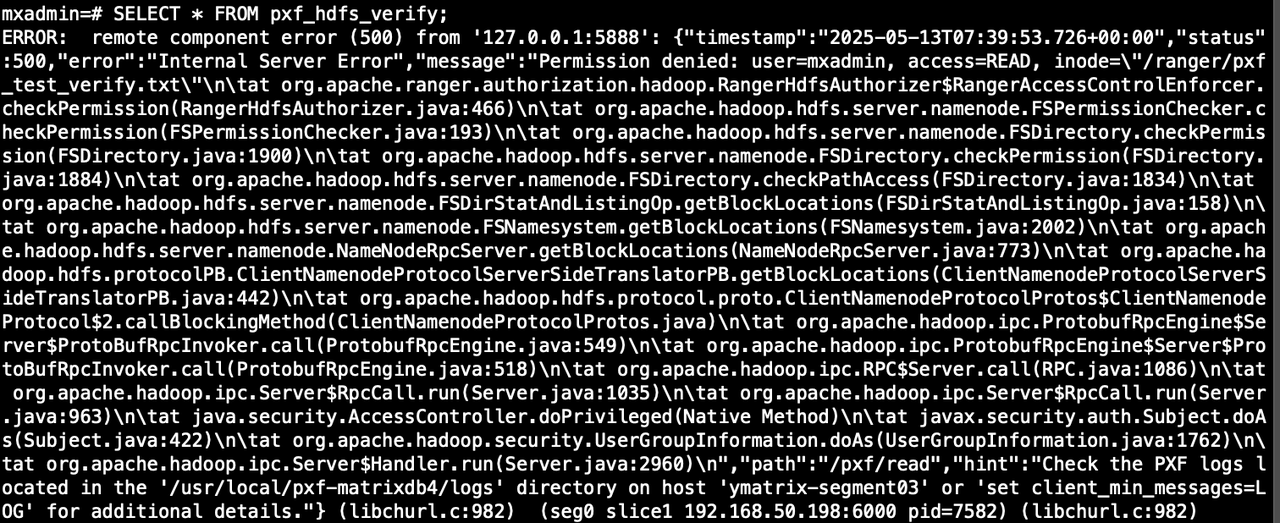
When ranger is configured with Allow Conditions
SELECT * FROM pxf_hdfs_table;